Shop For Kitchen Faucet With Ease And Reliability

Kitchen Faucet Reviews

Unfortunately, I lack the time and the budget to get each and every faucet in the market, try it out and put up a well thought out kitchen faucet review. Nevertheless, I will be testing new faucets every now and then, uploading my take on various designs and styles. My hope is to create a meeting place for homeowners, designers and interior decorators, who can interact and share ideas, find inspiration and eventually buy a kitchen faucet of their liking. Every single faucet on this site is rated on various criteria such as functionality, design, warranty, extras, durability and more. It is my goal to provide a diverse and detailed range of reviews, with faucets in every conceivable budget range, starting from the lowest of lows to the designer end.

Feel free to browse around the site. You will find plenty of information on kitchen faucets starting from styling, to repair and maintenance. Plus, you can use my concise buying guide to select an exact kitchen faucet style and design, suited to your existing or soon-to-be kitchen. Also, feel free to leave comments and suggestions anywhere on the site, it will only help me improve my site and serve the community better

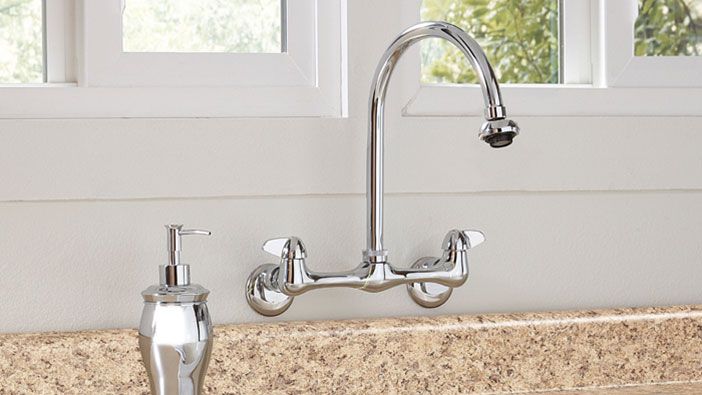
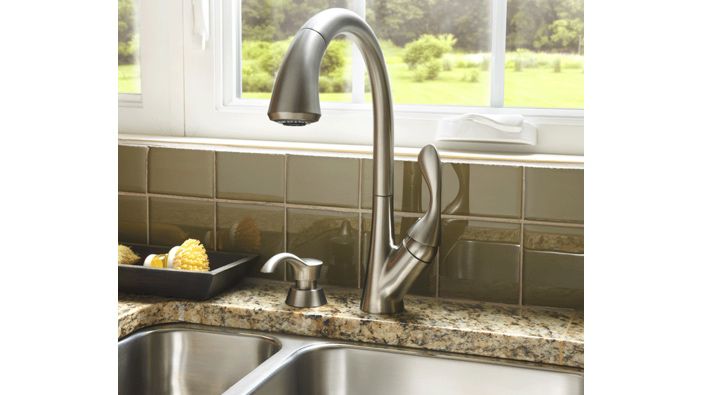
If you are just starting to shop around for a kitchen faucet, one thing is going to become clear to you early on: There are a lot of brands and products to choose from. When it comes to choosing a kitchen faucet, there are several conditions and features that you will want to keep in mind. For example, there are essentially two major types of faucets, these being deck-mounted faucets and wall-mounted faucets. You will also want to choose between one-handle faucets or two-handle faucets. There are also a number of different finishes, including bronze, chrome, nickel, and stainless steel.

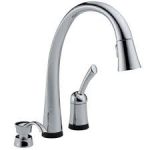
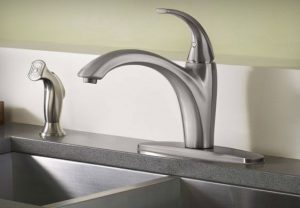
The mid-range price tag means you are getting a solid faucet with a number of features, easy installation, and much more. Delta Faucet has a good reputation with their products. This faucet, which is ideal for vintage-style kitchens, is a good example of what we are talking about. The touch-clean spray holes and diamond seal technology means a faucet that provides performance and durability for a long time.

Moen is another brand name with a good reputation among contractors, homeowners, interior design experts, and others. Moen 7594ESRS offers motion sense technology, which makes using the faucet a snap. The faucet is also AC adapter powered, which means you can choose to run your faucet sensors on either AAA batteries (six total), or with the AC adapter that will be included with your purchase.

The best kitchen faucets

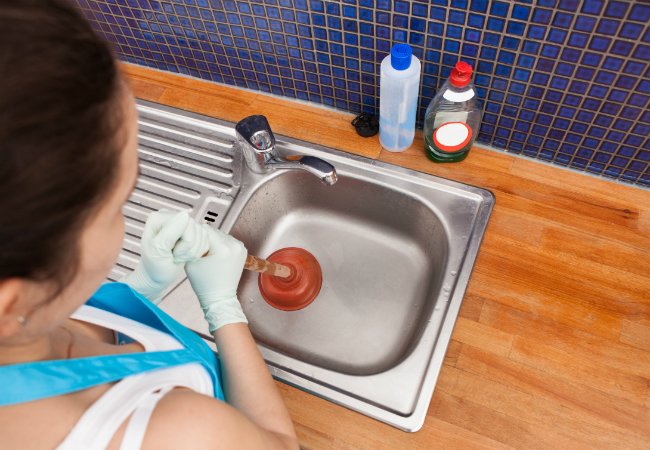
The workhorse kitchen faucet is often taken for granted — until it breaks. Just think of how frequently you and other household members use it to wash your hands, get a drink, scrub vegetables, rinse dishes, wet sponges, and more. Ideally, you want one that stands up to everyday use.

Choosing a kitchen faucet may seem like a mundane task, but it’s actually important. You want the right kind to fit your needs and your kitchen’s decor, and you don’t want to simply opt for the cheapest model.

Valve Control: This is the mechanism that turns your faucet on and off, and adjusts the temperature of the water. Single-handle designs use one lever to control both temperature and flow, while double-handles have two (each handle controlling either the hot or cold water supply). Touch and motion-activated designs are convenient in a lot of ways, but they are dependent on a power source for their sensor.

Spout style: Choose from revolving or stationary, regular (steady stream) or two-mode (regular and spray), low arc (3 to 8 inches above the top of the sink), or high arc (also known as gooseneck, which is more than 8 inches above the top of the sink) models.

Spray head: The sprayer can be separate from and next to the faucet, or at the end of the spout. The latter type is either pull-down (often on taller faucets) or pull-out (which sometimes includes much of the spout itself).

Best Types of Kitchen Faucets

The importance of having a good faucet in the kitchen cannot be overemphasized. In fact, any small problem with the faucet is enough to cause a significant amount of inconvenience to its users. This is the reason why home or establishment owners have to work hand in hand with professional contractors when planning a highly functional kitchen that is not prone to damage and other issues. Part of planning a functional kitchen is the installation of a good faucet

However, searching and determining the perfect faucet for your type of kitchen may prove to be daunting. To make this process a lot easier for you, we have the best kitchen faucets reviews for you to check out. Spoiler alert: You may fall in love with more than one faucet, so choose wisely

This faucet is perfect for people looking to have a faucet endowed with a metropolitan minimalistic design which is capable of accommodating tight backsplashes. Its visual angularity works beautifully with its clean, sleek and modern look. Everything about it never fails to enhance the interior surrounding where it will be installed.

It has a pull-out spray head mechanism along with its 1.8 gpm that gives you the chance to adjust the amount of water that goes out from its spray head. Plus, its toggle feature also enables people to toggle between a stream mode and a spray mode.

Delta Faucet Essa 91130 has all the basics that make faucets capable of giving the best cleaning experience for its users. There is more to its function rather than its form as it also ensures good sink access. It also boasts of easy clean features. This one is available in four different types of finish, with each design suitable for a 3-hole or 1-hole sink

Choosing the right kitchen faucet

The fit: Start by examining how many holes are on your sink or countertop. This will determine the kinds of faucets you’re able to choose from. Deck plates are used to cover up old holes, allowing you to go with a newer one-hole faucet, but more homeowners are choosing the clean look of a faucet without a deck plate.

The function: A good faucet is about much more than just looks – it needs to keep up with you in the kitchen and work the way you like. Test out different faucet styles to see what feels most comfortable. Do you like the straightforward function of separate hot and cold handles, or do you find it easier to use single-handle faucets? Would you really appreciate the convenience of a hands-free faucet, or are you looking for something more classic?

The finish: Basic faucets are the standard polished chrome, but there are so many more possibilities once you start to look around. Bronze and black finishes add drama and sophistication to a kitchen and brushed nickel while unpolished chrome finishes are sleek and modern. You can also get kitchen faucets with a beautiful slate finish.

The aesthetic: Instead of the standard side sprayer, did you know you could choose a faucet with a pull-down spray wand? Homeowners with minimalist kitchens love the clean design of these double-duty faucets.

The height: Chefs and foodies tend to choose faucets with a high arc – a faucet that’s 8-10 inches above the sink – so they have plenty of room to lift pots and dishes in and out of the sink.

The Plumber: Down and out over kitchen faucet choices

I was looking to upgrade to a new kitchen faucet and wanted a faucet with a built-in spray head. I always called that type faucet a “pull-out” but now I’m finding out that there is a “pull-down” style as well. What is the difference?

For kitchen faucets with built in spray heads I’ll break your question down to three types and give some advantages to each style. First, pull-out spray: This type pulls out horizontally and features a larger hand grip for easy control. Also is great for filling things like tea pots and pet bowls.

Finally, spring-loaded: This semi-professional style looks like a faucet you may see in a busy professional kitchen. The spout is basically a flexible spring and can be moved in every direction. So, if you’re not sure about pull-down or pull-out, a spring-loaded can give you a new twist on your faucet choices.

We have a large master bathroom with a walk-in shower complete with a seat. For years I wanted to add a steam unit to this shower and figure now is the time. What are some bathroom basics to consider when adding a steam unit?

First, you’ll be introducing extra moisture into the bathroom area and that moisture needs to be removed. So, work with your contractor to check if your bathroom fan and fresh air intake can handle the additional moisture. If not, exhaust fan upgrades may be required.

Ways To Free Your Toilet From Being Clogged Toilet

How to Unclog a Toilet

Stuck with a clogged toilet in your bathroom? Well, you’ve come to the right place! Clogged toilets are a common issue that homeowners will face every now and then, and can get frustrating at times. Follow these steps to unclog your toilet like a professional plumber!

Now that you’re prepared, follow these steps:

Step 1: Once you notice the toilet is clogged, prevent the toilet from overflowing with water by turning off the water. Do not try to unclog your toilet by continuously flushing it.

Step 2: Cover the floor around the toilet with old towels or paper towels to prevent a mess

Step 3: Grab your rubber gloves and toilet plunger and insert the plunger in the toilet with the rubber cup covering the trapway hole completely

Step 4: Vigorously pump the handle of the plunger for 5-10 minutes. You’ll notice the water in the bowl will begin to drain. This may take a few tries depending on how clogged the toilet is.

Step 5: Take the plunger out of the toilet and set it aside. Turn the water back on and try flushing the toilet once to see if it is unclogged.

Step 6: If you flush once and the toilet is still clogged, repeat steps 4 and 5 until the toilet is unclogged and the flush is back to normal.

Hacks for Stubborn Clogs

Sometimes a plunger just isn’t enough to fix the even the most stubborn clogs. If you find yourself exhausted after repeatedly using the plunger with no results, have no fear! Try these hacks to help loosen the clog.

Avoiding Future Clogs Starts with a High Performance Toilet

Are you finding that it doesn’t take much to clog your toilet and that you’re constantly busting out the plunger? Make sure that you are only flushing toilet paper. Flushing common toiletries such as facial tissues, cotton swabs, tampons, or dental floss can easily clog your toilet because they do not break down in water. Alternatively, if you own an older toilet, you may want to invest in a new toilet for your bathroom, as some older toilets are engineered with weaker flushing power. American Standard offers a variety of toilets that have high performance flushing technology that can last for years to come. The Champion collection of toilets range from a 1.28 – 1.6 gallons per flush flow rate, and are EPA WaterSense Certified to help conserve water

Choosing a Toilet

A head-to-head comparison for our readers with nothing to go on

At first the toilets in our house were merely sluggish. Then they got slower and slower until they didn’t flush at all. But the toilets weren’t clogged. Something was in the sewer line. So I rented a sewer snake, unscrewed the clean-out and fed the hungry snake down the chute. In it went 10 ft., 25 ft., 40 ft. Still, the pipe didn’t drain. As I pondered the problem, my young son stuck his head out the window, his little fists full of his favorite action figures, the Teenage Mutant Ninja Turtles. “Turtles live in the sewer, Daddy,” he said.

Gone are the days when we could flush toys.

After our sewer was deturtled and the attendant blockage removed, our toilets flushed magnificently. What was amazing was that all those Teenage Mutant Ninja Turtles could ever have been flushed down the toilet at all. But those were the days of the 5-gal. flush. With that much water chasing after them, an entire flotilla of Ninja Turtles could’ve been flushed home at once-and might have been.

How 1.6-gal. gravity toilets work

Regardless of price or style, all gravity toilets depend on gravity to pull the water-and waste-through the system (drawing right). When the handle is pushed, a flush valve opens, and the water in the tank drains into the bowl, either through rim openings, through the large siphon-jet opening across from the drain at the bottom of the bowl or through a combination of both. The gravity-fed speed of the water pushes the waste through the trap and into the drain.

Old 5-gal. toilets and new 1.6-gal. gravity toilets work the same way. The tank holds the water above the bowl. The lever opens the flush valve, which lets the water rush out of the tank into the bowl, either through rim holes, a siphon hole or both. In the bowl, the pressure of the water rushing down the drain creates a vacuum or siphon effect that draws the waste with it. Meanwhile, an automatic valve refills the emptied tank.

What this country needs is plunger lessons

Complaints against the 1.6-gal. toilet include sluggish or incomplete flushing; a small “water spot,” as the area of the toilet bowl water surface is called; staining; and the need to double-flush or triple-flush. Critics say that if a 1.6-gal. toilet is flushed more than twice, it uses more water than the now illegal 3.5-gal. toilets.

Tips For Preventing Toilet Troubles

It’s safe to say there are a lot of people who are afraid to mess with household plumbing – and we understand that. Plumbing can be scary if you don’t know what you’re doing, and nobody wants to be responsible for their house flooding, the toilet spewing sewage all over the bathroom, or pretty much anything else that involves large quantities of water or human waste being anywhere that it doesn’t belong. However, knowledge is power, and as a general rule, an ounce of prevention is worth a pound of cure. The very best thing you can do for your home’s plumbing is also the easiest: maintain it.

DO clean your toilet regularly with a mild cleaner. Vinegar, baking soda, or a mild soap are all great for regular porcelain cleaning. Not only does cleaning your toilet help you keep a more hygienic, better smelling bathroom, it also gives you the opportunity to spot a leak or a problem with your bathroom’s plumbing fairly quickly. If you never really clean up around the toilet area, how will you know if that water on the floor is from your shower, your toilet, or the sleepwalking male members of your household?

DON’T use chemical drain cleaners to unclog your toilet. While some plumbers say ‘yea’ and others say ‘nay’ when it comes to using these products, we say it’s just not worth the risk. Not only are these products harmful to your health if accidentally splattered on your skin, consumed, or even inhaled too much, they can damage older fixtures and pipes, and really aren’t something anyone wants in our water systems. They can also cause a lot of trouble for homes with septic systems if they kill off the good bacteria in there.

DO inspect your toilet’s inner workings about every 6 months to make sure the components are still in good shape and functioning properly. Take the tank lid off and flush the toilet. Watch the components work, making sure the flapper is sealing well and the fill valve stops running at an appropriate water level.

DO fix a running or leaking toilet right away. Toilet leaks are typically “silent”, in that you won’t necessarily find a puddle of water on the floor since the water is usually leaking out from the tank into the bowl (and down the drain). This makes it fairly easy to overlook the leak, or to keep putting off fixing it. Toilet leaks are generally slow leaks too, so you might not even notice a small increase in your bills each month until you look back and realize you’re paying $100 more for water this month than you did at the same time last year.

The Right Way to Use a Plunger

If your toilet’s overflowing or your sink’s stopped up, it’s time to take the plunge! About 90 percent of the time, a clog can be cleared with just a couple of thrusts of a plunger. To make the messy job easy, though, it’s important to have the right kind of plunger and the proper technique. As it turns out, not all plungers are created equal; some are best suited for sinks and showers, while others are appropriate for use on toilets. Once you’ve determined the best tool for the job, success is all about form. Contrary to popular practice, repeatedly flushing while frantically pumping won’t release the blockage any faster—instead, it will break the plunger’s seal and ruin the suction. To keep the water flowing freely down your pipes, avoid those amateur mistakes and learn to plunge like a pro with these valuable tips.

Pick the Perfect Plunger

Start at the very beginning: While there’s probably a shelf full of plungers available for purchase at your grocery or home improvement store, the two most common styles are the cup plunger and the flange. It’s smart to stock one of each and be familiar with their strengths so you can determine which one’s right for your mini-emergency.

The Cup: When you think of a plunger, the image that comes to mind most often is that of a simple wooden handle attached to a rubber cup. It’s this cup that gives the tool the name “cup plunger.” This design is most effective on flat-surface drains, which are found in the sink and bathtub. While it works well for a sink, shower, or bathtub clog, the cup plunger can’t create a sufficiently airtight seal in the curve of a toilet drain to produce adequate suction.

The Flange: A toilet clog calls for a different type of plunger entirely: the flange plunger, which has an extra ring of rubber (the flange) around the cup. The flange is inserted into the toilet drain, sealing in the air and increasing the suction power. In a pinch, you can fold the rubber ring back into the bell of the plunger and use it to unclog a tub or sink drain, but a true cup plunger will be more effective.

Plunging a Sink, Shower, or Tub

When using a standard cup plunger, start by covering the overflow drain, if there is one, with a wet towel. Doing so prevents air from escaping and decreasing the suction power. While you’re at it, it’s a good idea to seal off any nearby drains in sinks or tubs to ensure better results. To further improve the plunger’s suction power, create a tighter seal by lining the rim of the cup with a small amount of petroleum jelly.

Unclog your toilet with this simple and ingenious trick — no plunger required

Over the course of many years, I’ve practiced and honed the ancient art of unclogging a clogged toilet without needing to use a plunger. Why not just buy a plunger? Simply put, I never needed to on account of this particular bit of washroom wizardry. This technique is especially handy if you ever find yourself staring down a stopped-up commode in someone else’s bathroom with no plunger in sight — a situation in which you might be understandably reluctant to call for backup.

I didn’t invent this particular process for plunging without a plunger — the same basic technique can be found all across the web on plumbing and DIY blogs, both mainstream and obscure — but I can attest to its power and might.

Most bathrooms have everything you’ll need

To perform this trick, you’ll need three things that can be found in almost any bathroom: soap, hot water and a vessel for transferring the water to the toilet bowl. Dish soap and a 5-gallon bucket work best, but if secrecy is paramount and leaving the lavatory would blow your cover, a small plastic waste bin and a few pumps from a hand soap dispenser will do just fine.

Mixing the magical potion

The objective is to get the liquid in the toilet bowl as hot and soapy as possible without letting it overflow. You can either pour (or pump) soap directly into the bowl and then add hot water, or you can mix the soap with the hot water before you add it to the bowl.

Carefully and gently add the hot water

Mixing everything up in the toilet bowl is the step requiring the most finesse. You want to raise the average water temperature and get the soap into every crevice, but you don’t necessarily want to create a slurry with what’s already in there.

Design Your Home Around A Kitchen Faucet Sprayer

How to Buy a New Kitchen Faucet

Buying the right kitchen faucet depends largely on the existing plumbing. Choosing a new kitchen faucet can be easier than you think once you consider three important details before you begin shopping.

Start With the Sink’s Faucet Holes

There are many different kitchen faucet and sink designs available, but they’re not always compatible. Start by taking a look at your kitchen sink to determine how many pre-drilled faucet mounting holes are available. This applies if you’re installing a new faucet in an existing sink or buying a completely new faucet and sink.

The location of the sink mounting holes is another thing to keep in mind. Often, the faucet is located close to the center of the sink, but this is not always the case. If the faucet will be mounted on one side of the sink, the spout needs to be long enough to reach the opposite basin for it to be of use. A tall spout with a pull-down spray nozzle is another option for a sink with corner mounting holes.

Where’s the Mount?

There are top-mount and bottom-mount faucets. Top-mount faucets attach from underneath the counter. The screws are screwed in through the bottom of the faucet. Bottom-mount faucets attach from the top of the counter. The screws are installed through the top of the faucet piece.

Check the Water Lines

Make sure the new kitchen faucet you want is compatible with the water supply lines. Look under your sink towards the bottom of the cabinet and note the size of the existing water line and the shutoff valves

Kitchen Faucet Buying Guide

Faucet Types: Deck-Mount or Wall-Mount Faucets

Deck-mount faucets attach to the countertop or rest on the sink. Wall-mount faucets attach through the wall and hang over the sink.

Faucet Handles

Typically, kitchen faucets have either one handle rotating directionally to change water temperature or two handles for mixing hot and cold water. These include a sprayer that sits to the side or a pull-out or pull-down sprayer with spray and stream options.

Sink Use

Before you choose your faucet, think about the ways you use your sink. Do you wash a lot of bulky pots and pans? Are you bathing a baby? A high-arc faucet might make your tasks more comfortable.

Faucet Finishes

If you prefer a unified look in your kitchen, select a faucet with a finish that matches the cabinet hardware. Bronze, chrome and nickel/stainless steel are available at every price point.

Faucet Features

In-faucet filters are great for filtering tap water. Keep volume and maintenance in mind to decide if this is the right filtering option for your family.

How to Choose the Right Faucet for your Kitchen

Designing and remodeling kitchens can be one of the most rewarding and trying home projects you’ll take on. From paint colors to countertops and cabinetry, there are choices to be made at every turn. Finding the right faucet for your kitchen is no different, and with so many styles to choose from, we’ve created an easy guide to help you narrow down the best faucet for your design. Read on for tips to find the best faucet for your style, budget, and performance needs.

Deck-Mounted Faucets (faucets mounted on the sink) are a popular choice for those who love options and lower costs. These mounts are generally easier to install and offer more features and styles. Many sinks come with 1-4 pre-drilled mounting holes, and most deck-mounted faucets come with decorative deck plates (escutcheon plates) that will cover any hole you don’t need, allowing you the option for double-handled or single-handled sinks with or without built-in soap dispensers and sprayers. Before you begin choosing the right faucet, it’s important to check the plumbing on your current sink and count the pre-drilled holes it has.

Single-Hole Installation: For those who appreciate clean lines and spacious countertops, single-hole installations offer the convenience of a faucet that takes up the least amount of space. These fixtures are an all-in-one faucet that come with a single handle for water adjustment and the option of an attached, pull-out sprayer.

Three-Hole Installation: Three-hole faucet mounts come with two primary options: a single-handled faucet with accompanying side sprayer, or a two-handled faucet. Both of these options make a more prominent design statement with a larger fixture to catch the eye. These faucet styles have maintained their popularity over the decades, and when keeping costs in check, many homeowners choose to upgrade their faucet with a fixture that uses the already-existing holes.

Four-Hole Installation: A four-hole installation is a luxury when it comes to design choices, allowing you the high-end options of a double-handled sink and separate side sprayer or built-in soap dispenser. For those who love built-in accessories, the four-hole installation allows a variety of options for your space.

Faucet Buying Guide

If you’re remodeling or upgrading your kitchen, the latest in top-notch hardware and tough finishes have made corroded, leaking, and dripping faucets a thing of the past. Most faucets also come with lifetime warranties (for the original buyer) that cover defects and even finishes.

Faucet Findings & Shopping Tips

In the graphic below we highlight single-handle pullout faucets, a very popular style that combines a spray head and spout for convenience and flexibility. But our findings are applicable to other faucet styles too. Here’s what else to consider when shopping for a new faucet.

Match the Faucet With the Number of Mounting Holes

Most sinks come with mounting holes pre-drilled for faucets and accessories such as side sprays or soap dispensers. If you’re keeping your original sink, you’ll need to match what you have or get a base plate to cover any extra holes. The base plate sold with your new faucet can be used to cover holes in your countertop, but don’t buy a faucet that requires more sink holes than your sink has; it’s not a good idea to try to drill additional holes in an existing sink or countertop.

Spout Styles and Shapes

Straight spout faucets are compact and often inexpensive, but you might need to move the faucet to fit a big pot under it. Gooseneck models have higher clearances, but can cause splashing if your sink is shallow. Whatever style you pick, make sure the faucet head swings enough to reach the entire sink, especially if you have a wide or double bowl sink. Also keep the faucet proportional; a large sink can look odd with a small faucet.

Installation and Repair

Replacing a faucet and a sink at the same time is easier because the faucet can be installed in the sink, or in the countertop before the sink is put in place. Fittings that can be tightened with a screwdriver also streamline installation. Long water-supply hoses allow you to make connections lower in the sink cabinet where tools are easier to use. Though most faucets are guaranteed not to leak, if yours does, the manufacturer will give you only the replacement part—it’s up to you to install it.

Ways of choosing the best kitchen faucet

Your kitchen is always an important place that everyone must concentrate on. This is because everyone spends more time in their kitchen than any other place although no one notices that. Due to that, everyone would want to make their kitchen is a better place. For your kitchen to be your joy, there are so many factors that you should consider before selecting your kitchen faucet. Choosing is not easy at all and this is why you should be extra vigilant when choosing your best kitchen faucet.

Most of the time, people choose their best kitchen faucets depending on the looks of the faucet. This might deceive you because not everything that glitters is gold. When choosing your kitchen faucet, make sure that you select one that is durable enough. After you have known that it is long lasting, you can now go ahead on selecting the looks.

Spending is also what you should consider when selecting your kitchen faucet. By this I mean, you can spend enough for a faucet that is worth spending but you should not spend in excess. You might spend low on your kitchen faucet but it’s possible that the faucet will be of low quality. Spending more will be a plus on you getting extra features more than just durability and reliability.

Watch the reach and sprout of the faucet that you are choosing. Sometimes looks may intrigue you but if at all your kitchen shelves are above your sink, choosing a tall sprout might not help. This is because it might not fit at all. Also, when your kitchen sink is the three bowled type, a short sprout might not be able to cover all the corners or the bowls. Therefore, it is important to choose your kitchen faucet according to how your kitchen is designed.

Kitchen faucets can sometimes be really annoying. Some can drip which is not a very good experience. Therefore, it is really tricky to choose a kitchen faucet. To avoid leaking and dripping frustrations, consider choosing a kitchen faucet with ceramic valves. This one won’t fail you at any point. Other valves can be good for a period of time but after some time, they will eventually start leaking. Apart from the leaking character, ceramic kitchen faucets are durable and reliable than any other kind of faucets. You do not have to worry about the cost because the ceramic faucets cost the same as any other kind of faucet. You just have to go for what is the best.

Necessity Of Sewer Inspection Line Inspection And Its Procedures

Plumber Services: Sewer Inspection and Repair

What You Should Know: Sewer Line Inspection and Repair

Sewer inspection and repair is nowhere near as difficult as it used to be. We now have the technology to not only inspect problems without digging, but repair or either fully replace systems without having to do so. Here is a quick guide to what you should know about sewer line inspection

Inspections

Inspecting sewers is a very simple process nowadays. Whereas in the past, the whole area would have to be dug up to identify which sections were causing trouble, now a video camera can just be inserted into the pipe instead. These cameras are able to give a clear picture of what is going on inside the pipe, and precisely which parts are in need of repair. They can assess the type of damage and the severity of it – cracks may have formed due to root intrusion, old materials may be breaking down or the pipes may just be clogged.

This video technology is perfect for the average homeowner, who is unlikely to be an expert on the sewers. This allows them to fully understand what is going on and the mistakes that they have perhaps been mistaking. It can also stop them from being overcharged by bad repairmen, who in the past could try and say that a problem is worse than it actually is.

Video cameras can be used after repairs too, to clarify which areas have been fixed and if the job has been done properly. For example, if the pipe has been relined, a video inspection can discover whether the new lining has hardened against the existing pipe as it should.

What a Sewer Camera Inspection Can Do

While a sewer camera cannot find leaks, there are certain situations where the camera alone is effective.

Locate Lines

Sewer cameras have location devices that send out a signal. Using a special signal receiver above ground, our plumbers pinpoint where the camera is underground.

Drainage or Stoppage Issues

We call this your “sewer is not working as it is designed to work.”

Sewer pipes work using the power of gravity. The pipes flow downhill so when something goes into the pipe—waste, debris, water—it flows or drains down through your piping system and ultimately ends up at your city’s waste treatment center or septic tank, depending on your particular situation.

However, if something is causing your system to not work properly, in most cases we can use a sewer camera to determine what is causing it. Often in cases like these we find stoppages, blockages, roots, mud, broken pipe, etc.

PVC or Cast Iron Pipe

We determine what type of system you have by running a sewer camera inside the pipes.

Sewer System Connections

With a sewer camera, we can see fittings, tee’s, and other types of connection. We can also use it at the connections to run water. We’re able to see where the water flows to or from and/or comes from one line to another.

5 Symptoms of a Damaged Sewer Pipe

If your cast iron sewer pipes are 25 Years old or older, they could fail at any time. Your drainage lines may already be damaged by tree root intrusion, cracks, channeling, or misaligned connections before you experience complete sewer line failure. Do not let your plumbing get to the point where it fails! A failed or collapsed sanitary sewer line will cost you tremendously more to repair than proactive maintenance and repair will. This article highlights 5 tell-tale symptoms that your sewer line is deteriorating and possibly broken.

Sewage Backups and Blockages

Sanitary sewer backups usually occur in the lowest open drain. A sewage backup is typically caused by a blockage somewhere in the line. If you experience a backup every time you flush or run water down your sink or bathtub drain, then the problem is likely in your main sewer line since all drains rely on the main sewer line to drain properly. However, if backups are limited to only one drain then your problem is likely isolated to that drain.

Sewer Gas Odor

If you can smell sewer gas in or around your home or building, this is a tell-tale symptom that there is a crack somewhere in your sewer system. A sanitary sewer should be airtight everywhere with the exception of vent stacks on your roof which allows for the sewage to move downhill. This means that you should never smell sewer odor unless there was a crack or opening in your sanitary sewer lines.

Mold Problem

In addition to sewer odor, mold growth may also be a sign of a break in your sewer lines behind your walls. There are molds that only need the humidity level to be higher than 55% to start growing. Considering that, a cracked sewer pipe behind a wall can cause the humidity levels to rise to a point suitable for a mold problem to begin. If you notice mold growth in your home accompanied by sewer odor then you likely have a break in your sewage drain pipes.

Slow Drain

A slow drain may be a symptom that a blockage is forming which will eventually lead to a sewage backup. If your toilet, bathtub, or sink is draining slowly even after attempts to clear the line, you may have issues such as tree root intrusion, channeling, or cracks, mentioned above in the beginning stages.

Note: Beware of using chemical drain cleaners to solve a slow drain or blockage. As the chemicals sit in the pipe they will eat away at the cast iron and/or PVC.

Extra Green and Lush Patches in Grass

Spotting an extra green and lush patch of grass in your yard may be due to a sewage leak underground. Since sewage acts as a fertilizer for vegetation, leakage from your main line into the surrounding soil will give the surrounding grass extra nutrients that will result in a lush and extra green appearance.

How Often Should I Have My Sewer Line Inspected?

Most experts will recommend having sewer lines inspected prior to purchasing or renting a new home to be sure that there are no issues the buyer might be unaware of. Periodic cleaning of sewer lines can also help prevent clogs and backups in the sewer drains – a headache no one wants to deal with.

If the home has a history of lines draining slowly, it’s a good idea to have them inspected and cleaned before a major clog happens. In addition, homes that are more than forty years old are probably due for a cleaning even if the drains appear to be functioning normally. Other environmental factors can affect the sewer lines as well, such as penetration by tree roots underneath the property. Grease, hair, food, and other blockages can also gradually build up over time and cause a major sewer clog. Signs of trouble include slow drains, foul smells, gurgling pipes, or water pooling around toilets and bathtub drains. Because these things happen beneath the ground, it’s difficult to monitor or even know that there could be an issue without having the line inspected periodically.

How to Clear a Sewer Without a Snake

You can often clear the sewer yourself. The best tool is a sewer auger, also known as a snake, but you can still do the job if you don’t have one. Even though the cost to clear a main sewer line clog can be considerable, you shouldn’t hesitate to get professional help if you’re unsuccessful. Sewer clogs can be caused by tree roots or septic problems that require the use of special tools and techniques.

Use a Plunger to Clear a Main Drain Clog

You may be able to clear a sewer clog by using a plunger.

  1. Choose a toilet on the ground floor.
  2. Tape over the tub, sink and shower drains with duct tape. This prevents the force you develop with the plunger from dissipating through the pipes and focuses it on the clog.
  3. Get a bellows or force-ball plunger, insert it in the toilet bowl, let it fill with water and then plunge away.

You’ll know this technique is working if the standing water in the toilet begins to drain. As soon as this happens, pour 2 or 3 gallons of very hot water in the toilet to help the clog dissolve.

Bust a Sewer Clog With Enzyme-Based Drain Cleaner

It’s hardly ever a good idea to put Drano or a similar product in the toilet because it contains sodium hydroxide, which generates heat and can damage the pipes. It’s a particularly bad idea if it turns out the clog is caused by tree roots or a septic problem because the corrosive chemical will remain in the pipes and could give skin burns to anyone who tries to clear the clog using other methods.

An enzyme-based main line cleaner is safer, but it takes longer to work. If you purchase one of these products, use it according to the directions and give it a few days to do its thing before you move on to the next method.

Attack a Sewer Clog With a Hose or Power Washer

You may need more force to clear an especially stubborn main drain clog, and you should apply it through one of the drain cleanout fittings. You should have one or two of these in the basement and more outside. Open one of them by unscrewing the cap with a wrench and have a bucket handy to catch water. You’ll also want to wear protective clothing, goggles and gloves because the water may be under pressure and could spray when you open the cleanout.

If water does spill out, you’re on the right track because it means the clog is downstream of the fitting. Insert a hose with a high-pressure nozzle or preferably a power-washer wand with a 0° (red) or 15° (green) tip. Place the bucket under the cleanout, point the nozzle downstream, pull the trigger and stand back.

A long, sustained blast of water is more effective than a series of short bursts, but stop when the bucket fills and empty it. If you haven’t made any progress after emptying the bucket two or three times, it’s time to either get an auger or call a plumber.