Can you patch a roof from the inside?
This section is a step-by-step guide to find the source. Some methods require two people plus roof and attic access. Contact a professional if you’re unable to execute any of these steps safely.
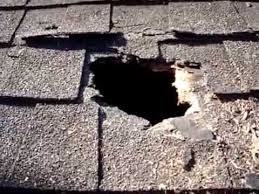
Locating the exact leak location isn’t always as straightforward as it may sound, especially with pitched roofs. Leaks tend to be higher up from the obvious interior leak. Water gets under the shingles and then travels down the rafters or sheathing before finally finding a nail or protrusion to aim that stream of water at your ceiling. Once there, it may pool and cause sagging or bubbling, or it may travel farther, finding light fixtures or other openings to drain through.
Below are the tools you’ll need to help you discover the source of the problem.
- A Helper
- Ladder
- Garden Hose (if it’s not raining)
- Dust Mask
- Flashlight
- Tape Measure
Finding the Leak
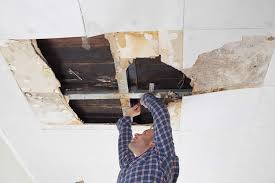
Finding exactly where the leak is coming from can be the most challenging part of fighting the leak. One common cause of leaks in the home is that water has entered through the roof, and settled into a pool inside the ceiling. When this happens, your ceiling will become waterlogged and will start to bulge; you want to get this water out right away. Get a large container and place it under the ceiling, then puncture the middle of the bulge to let the water flow freely. You’re already going to need to repair the ceiling, so this will allow the water to drip down instead of pooling more and damaging a wider area.
Once you’ve addressed any damage coming into the house, get up into the attic around the location of the affected ceiling. Be careful not to step anywhere that doesn’t have supports! You don’t want to do any more damage to your ceiling than has already been done. Using a bright flashlight, locate the affected area, and find the trail of water back to where it’s entering your roof.
Fixing the Leak from the Attic
Once you’ve spotted the leak, and found a way to get to it, you can patch it up temporarily with any durable material. Even a wooden plank or some spare shingling with roofing tar will do the trick; if you don’t have any on hand, sprint to the hardware store and get some so that you can fix the problem quickly.
Spread the adhesive material over the leak from the attic and hold your patch in place until it’s secure. Then, apply some more tar where the patch meets the roof to lock it in. Take good note of where the leak is from the inside so that you can find it more easily once you can safely get up onto the roof outside
What If I Can’t Find The Leak?
If you can’t find the leak in your roof you will need to cover it quickly with some plastic roof covering. This also goes for homes where there is no attic or attic access. Follow these steps to protect your home if you can’t do a temporary patch.
Buy & Prep The Roof Plastic
You likely don’t keep roof plastic just hanging out in a closet. So, you’ll have to head to the hardware store or call for help. Plastic roof covering comes in 4-foot rolls of polyethylene. Buy some and head home to get it placed on your roof. You’ll also need some 8-foot 2×4’s to act as anchors for your roof covering.
Cut The Plastic To Length
You’ll want to unroll the plastic with a little more length to run from the top of the roof (the ridge) to the edge of your roof (the eave). Don’t unfold your covering yet and cut it to length with a utility knife. You can use one of your 2×4’s as a guide to make the cut as straight as possible. Once it is cut to length you will unfold it to make a section that is long enough for your roof, and about 8 feet wide.
Attach The Cover To 2x4s
Roll one of the ends around an 8 foot 2×4 and use a utility staple gun to attach it to the wood. Take a second 2×4 to and sandwich the plastic between them, then nail the 2×4’s together. Do the same thing on the other end of your plastic roof covering to finish preparing your cover.
Place The Cover On The Roof
It should go without saying that safety comes first and if there’s lightning, you don’t have the ability, or the right equipment to get this done; you should be calling for emergency roof repair. If you’ve got rubber soled shoes, a saw to cut the 2×4’s, a ladder, and some courage to jump on your roof take your cover up there and set one pair of the 2×4’s over the ridge and then stretch the rest to go down to the eave.

Roof Leaks – Deciding to DIY
If you are sure that you want to DIY your roof leak, here are some helpful steps in order to fix the leaks.
- First you need to seal the leak ASAP. Find out where the source of your leak is. Examine the underside of your roof from within the attic or crawl space.
- Second, shine a flashlight along the roof’s underside and check to see if there is a hole in the roof. You’ll also need to look for any wet areas or dark spots caused by moisture.
- Third, the areas which you found to be leaking should be marked with some chalk so they can be spotted quickly.
- Fourth, the wet areas need to dry before sealing. Once they have dried, apply a patch to the underside of the roof. Using a putty knife will be the easiest way to do it. Cover the entire leaky area.
- Fifth, use a Caulking gun to apply caulk to seal any holes that are in your roof. The putty knife will help you spread the caulk evenly to cover the holes.
Using Sealants as the Solution
If the leak is due to faulty or missing flashing, sealants might be the cure. Use sealants on all flashing around skylights and protrusions like a chimney or vent. You should never use them to fix shingles permanently. It may work as a stop-gap measure to fix broken or cracked shingles until you have time to replace them.
For a quick, short-term shingle fix, all you’ll need is some mastic or roofing cement, a trowel and a flat bar:
- Lift the broken shingle up with the flat bar. You may need to pry the nail out a bit. If you do, don’t forget to hammer it back in at the end.
- Spread the sealant. Using the trowel, spread the sealant under the broken shingle.
- Flatten the shingle out gently. The sealant should seal the cutout – the gap between the tabs – on a three-tab shingle.