Electrical Safety: Safety & Health for Electrical Trades
How Do You Control Hazards?
In order to control hazards, you must first create a safe work environment, then work in a safe manner. Generally, it is best to remove the hazards altogether and create an environment that is truly safe.
How Do You Create a Safe Work Environment?
A safe work environment is created by controlling contact with electrical voltages and the currents they can cause. Electrical currents need to be controlled so they do not pass through the body. In addition to preventing shocks, a safe work environment reduces the chance of fires, burns, and falls. You need to guard against contact with electrical voltages and control electrical currents in order to create a safe work environment
Make your environment safer by doing the following:
Treat all conductors—even “de-energized” ones—as if they are energized until they are locked out and tagged.
Lock out and tag out circuits and machines.
Prevent overloaded wiring by using the right size and type of wire.
Prevent exposure to live electrical parts by isolating them.
Prevent exposure to live wires and parts by using insulation.
Prevent shocking currents from electrical systems and tools by grounding them.
Prevent too much current in circuits by using overcurrent protection devices.
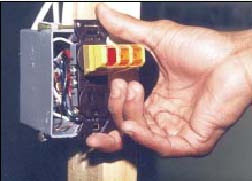
Lock out and tag out circuits and equipment
Create a safe work environment by locking out and tagging out circuits and machines. Before working on a circuit, you must turn off the power supply. Once the circuit has been shut off and de-energized, lock out the switchgear to the circuit so the power cannot be turned back on inadvertently. Then, tag out the circuit with an easy-to-see sign or label that lets everyone know that you are working on the circuit. If you are working on or near machinery, you must lock out and tag out the machinery to prevent startup. Before you begin work, you must test the circuit to make sure it is de-energized.
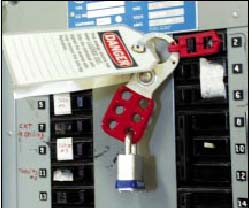
Lock-Out/Tag-Out Checklist
Lock-out/tag-out is an essential safety procedure that protects workers from injury while working on or near electrical circuits and equipment. Lock-out involves applying a physical lock to the power source(s) of circuits and equipment after they have been shut off and de-energized. The source is then tagged out with an easy-to-read tag that alerts other workers in the area that a lock has been applied.
Electrical Wire Size Required for Receptacles
What size electrical wire should you use when hooking up an electrical receptacle (wall plug or electrical outlet)? Here we explain the choice of No. 14 or No. 12 copper wire for 15A and 20A electrical circuits where receptacles are being wired.
This article series describes how to choose, locate, and wire an electrical receptacle in a home. Electrical receptacles (also called electrical outlets or “plugs” or “sockets”) are simple devices that are easy to install, but there are details to get right if you want to be safe.
What Size Electrical Wire Should I Use When Wiring an Electrical Outlet (Receptacle)?
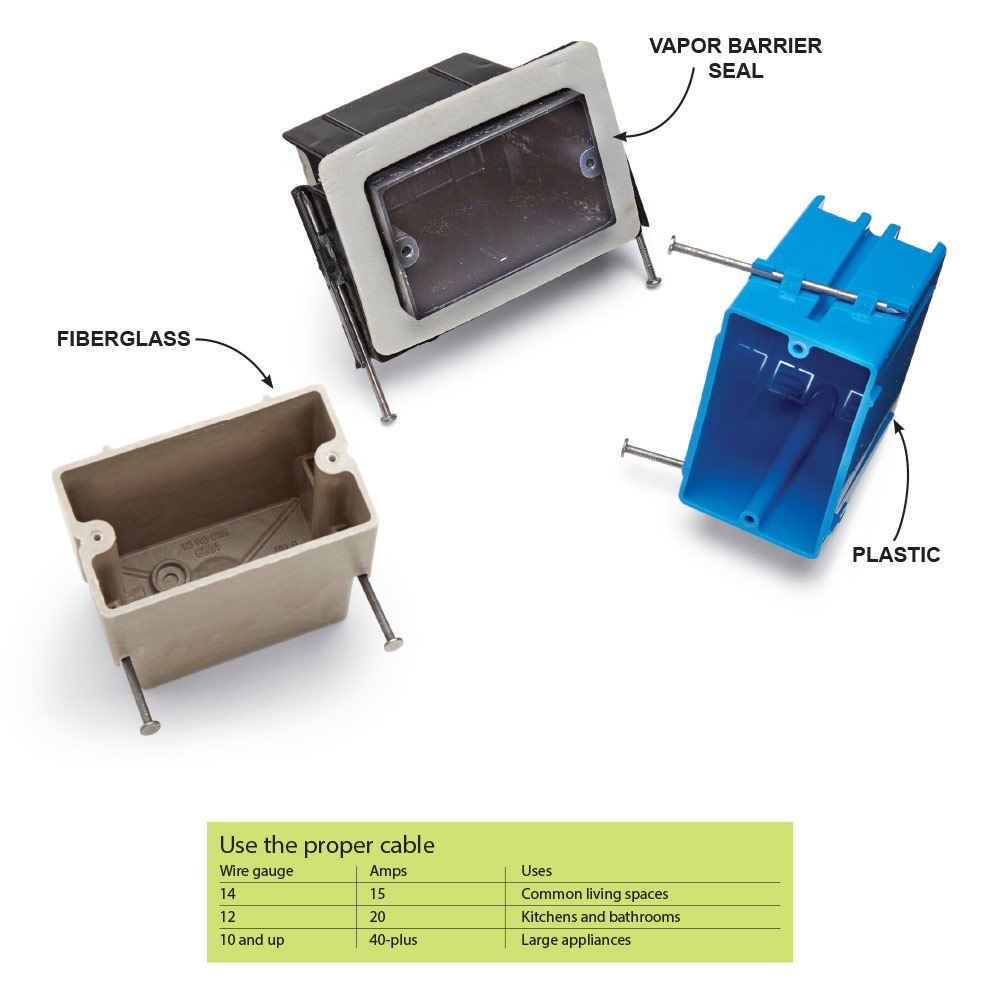
The electrical wire used for the receptacle circuit must be the proper type in size (thickness or gauge) and number of conductors for the ampacity of the electrical circuit
The electrical circuit must be properly protected by the right fuse or circuit breaker
For a 15-Amp circuit use #14 copper wire (or #12 copper-clad aluminum wire). The fuse or circuit breaker feeding this circuit is rated for 15 amps.
For a 20-Amp circuit use #12 copper wire (or #10 copper-clad aluminum wire).The fuse or circuit breaker feeding this circuit is rated for 20 amps.
For a 30-Amp circuit use #10 copper wire and a fuse or circuit breaker rated for 30 Amps.
For other wire sizes and a complete wire size table see SE CABLE SIZES vs AMPS – separate article
Note1: it’s safe and OK to use a smaller (lower ampacity) fuse or circuit breaker, such as a 15-amp fuse protecting a circuit wired with #12 copper wire
Note2: it’s generally safe and OK to use a larger size electrical wire, and a larger wire size may in fact be required for longer wiring runs. Generally you want a 3% or less voltage drop across the wire from source to point of use. For the U.S., electrical wire sizes vs. circuit ampacity are given in National Electric Code Table 310-16
All You Need To Know About Electric Wiring and Rewiring
Electric wiring and rewiring is an important aspect of consideration when you are renovating your old home or building a new one. It is a complex and time-consuming process which ideally should be done by trained professionals. When you make the decision of wiring or rewiring your home or office, you can come across a number of choices to make.
You can select from the different types of wiring materials which are available and the different wiring installation processes. Here, we will discuss some of the most common aspects of wiring/rewiring starting from the signs through which you can tell whether rewiring is required or not along with the different types of electrical wirings and their corresponding installation processes.
Signs That Your House or Office Needs Rewiring
Before the electrical system in your house or office collapses or causes any serious problems because of bad wiring, there are certain signs for which you can look out to determine if the electrical wiring needs to be repaired or replaced.
These signs are listed below:
Damaged or frayed wires are the first thing that you should keep a look-out for. This kind of damage may be caused by rodents, heat, corrosion, or simply because of being old. The frayed wires can not only lead to further electrical problems like short circuiting but can also pose a serious threat of electrocution.
If your electrical switches or plugs become warm or hot during usage, it can indicate a problem with the wiring. Improper wiring can cause overheating and result in serious electrical problems.
If your circuit breaker keep tripping, it can also indicate a problem with the wiring of the house.
If you notice smoke coming out from any power socket or an electrical appliance, it can be due to faulty wiring of the house.
If you notice that some of your lights flicker or dim when certain high-power appliances are plugged in, this can also indicate a problem with the wiring. The wiring may not be able to handle the load of the high-power device resulting in flickering or dimming of lights.
If you notice any loose connections near the power sockets, switches, and wires, try tightening them to not let the wiring get damaged any further.
Different Types of Electrical Wirings
When you want to change the wiring of your home, you will have the choice of selecting from several kinds of wirings available
Non-Metallic Cables (NM Cables)
NM cables are the most common types of wires which are used in houses and residential buildings. They contain three types of wires distinguished by different colors.
Electricians
Finding a home electrician
Most homeowners call electricians in an emergency or if they’re building or remodeling. It’s important to research a contractor and find a skilled electrician before you need one. By building a rapport with an electrician, you can be sure that they will be there to help when you need their services. So, you’ll want to hire an electrician for regular inspections before an emergency takes place. A good electrical contractor will become familiar with your home’s systems and possibly discover emerging problems before they become major situations.
Hiring an electrician is an important decision because they work with critical home systems that affect nearly every aspect of the building and can cause significant inconvenience, damage or even house fires if the work goes wrong.
Up-to-date education: A reputable company will require staff to attend regular training courses and stay current on the National Electrical Code, which is amended every three years.
Pulling permits: A permit is usually required in most counties and from the power company any time you’re replacing a home’s main electrical equipment or doing a significant amount of rewiring. The cost of the permit is often included in your electrician’s bill, but be sure to ask. With the permit comes an inspection to ensure the work meets code.
Legitimate licensing: If your state requires electricians to be licensed, check that the license is current. Poor wire connections, overloaded circuits, improper grounding and broken safety elements on an electrical panel are just a few of the problems that can arise from bad workmanship. To check an electrician’s licensing. You should also protect yourself by verifying the hold the appropriate bonding and insurance, including general liability and workers’ compensation coverage.
Electrical Rough-in Tips
Whether your project is finishing a garage or a basement or building an addition, it’s important to get the rough-in wiring done right the first time. We talked with several pros and got advice on drilling holes, installing boxes and pulling cable. With these tips in hand, you’ll work faster, avoid disasters down the road and put a smile on the face of your electrical inspector.
Which electrical box works best?
Either plastic or fiberglass boxes will do the job, and each is completely code compliant. Some electricians prefer fiberglass models because they’re tougher, but others prefer the plastic models because they’re cheaper.
Special cable staples
Staples (and drilled holes) need to be at least 1-1/4 in. away from the edge of a framing member. In some cases, that means stacking wires on top of one another and using one staple to secure them. Most standard staples can handle two wires. Never install staples over multiple wires unless the staple is approved for it. The staple package should list how many wires it’s rated for. The staple shown here is good for up to four wires.
Auger nits and angle drills work best
A 3/4-in. spade bit will work OK for drilling the holes, but auger bits drill faster and require less effort. Choose a bit like this Milwaukee ship auger bit that will chew through nails. It’s easier to drill straight holes through the studs with a right-angle drill. You can rent right-angle drills by the day, or you could buy an angle attachment for your own drill.
Install plates before pulling wire
Electrical cables need to be set back 1-1/4 in. or more from the edge of a stud or wood-framing member to protect cables from wayward nails and screws. Install steel cable-protection plates over holes drilled closer to the edge. Keep several plates in your pouch while you’re drilling and install them right away so you don’t forget.