How To Be Your Own Home Remodeling Contractor

What to Know Before Selecting Your Home’s Roofing Material

The right roof material can do more than simply keep you dry and protect your home. It is the icing on the cake, and can augment, or even define, the style of your home. Today we summarize your home roof material options, providing an overview of a subject that might not get the same attention as other architectural home design aspects — but which, in my opinion, should.

Considerations for Choosing a Roof Material

Let’s face it, a home without a roof is just four walls. If you’re constructing a new home, the roof material type will be specified by your plan set, typically determined by your architect with your consultation. The color may or may not be determined at that point. The material type is important to specify early on because different roof material types have different weights, and loads are considered by engineers who take the roof weight into account before completing your home’s structural calculations.

There are advantages and disadvantages to the various roof material options, but there is one thing they all have in common: When properly designed and installed in the right circumstance, all the common materials reviewed in this article are up to the task and can properly do the job of protecting your home from the elements.

Cost. Cost is a significant consideration, and there is wide variation among the options available. The likely cost of each material type is noted in the individual elements of this series. For remodels or re-roofing situations, there can be significant costs if your new roof material’s weight is greater than the material being replaced

Design style. Since all the material types are more or less capable of doing the job (some have benefits relating to different climates), the style of the various options becomes a key aspect that you and your architect should consider. Certain roof materials are good historical matches for certain home styles. An authentic Tuscan home, for instance, will likely want an authentic clay roof tile, although a concrete roof tile can provide a similar look at a better value.

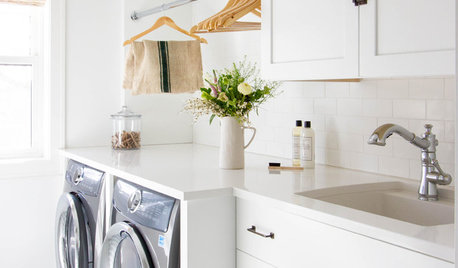
How to Remodel the Laundry Room

It’s true. There’s no standard laundry room size, shape or layout. Often these utility spaces are created in awkward leftover areas after every other room in the home has been planned out. Or they’re banished to dark corners of basements and garages. And yet you’ve probably noticed you’re spending a lot of time in that confined area. Shouldn’t that space warrant extra attention?

What Are You Hoping to Achieve?

Why have you decided to remodel your laundry room? And what’s important to you? The answers to these questions will inevitably affect your decisions and, above all, your budget. Are you simply after more function? Or are you hoping to make the space look nice too?

Do you plan on working with the space you have? Or are you relocating your laundry room to another part of your house? Buying new appliances and adding some paint or wallpaper is one thing; knocking down walls, rerouting plumbing and building an entirely new room is another.

Another question you should ask is, “Why now?” It’s good to think about why this is the right time to remodel or redecorate your laundry room. Is this a one-off project or part of a larger remodel? If you plan on eventually tackling a larger project, such as a kitchen or master bathroom, it could be more cost-effective to wait and do everything at once, when you’ll probably already have a contractor, tile installer and other professionals on site doing work.

How Do You Want the Space to Function?

Laundry rooms aren’t always just about washing and drying clothes. “People tend to store all kinds of things in their laundry rooms, from batteries to flashlights to dog food,”

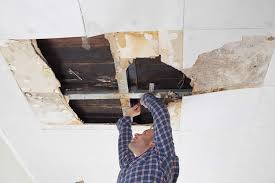
Ideas for Partially Finishing Your Basement

We’re always looking for more space in our homes, it seems, whether for extra storage, an additional living zone or a new spot to decorate. Often, valuable space can be found in the basement. While this can be a wonderful place to renovate if your budget allows, there are ways to enjoy that below-grade space even without a full remodel.

A pro can help you partially finish your basement to bring your home new warmth, style and comfort, as well as that extra space you’re craving. Here are some ways to make the most of an unfinished basement.

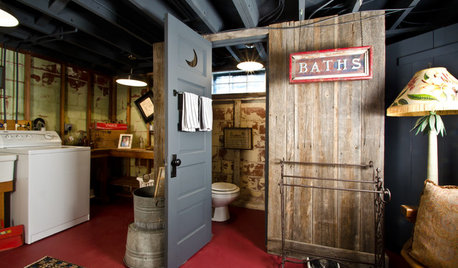
Keep the ceiling exposed. This smart basement renovation reveals a key secret to enjoying a partially finished basement: Keep the ceiling open. We don’t all have the advantage of deep basements with high ceilings, and we need all the help we can get, height-wise. While there are some stylish drop-ceiling panels now available, keeping the ceiling joists open and painting them a bold color like black creates the illusion of depth, helping the ceiling to recede and become less noticeable. The added advantage is that your wiring is available to you without having to cut into drywall.

Ditch the drywall. A shot of this basement from a different angle shows that in the living area, the concrete foundation walls and floor of this 1920s house have been given a clean coat of paint. Paint is quite often the quickest and least expensive way to freshen and update a room.

Another unexpected and low-cost alternative wall material is an engineered lumber such as oriented strand board (OSB), typically used for subfloors or sheathing in construction. This unconventional choice is a creative, less expensive way to cover concrete walls and divide living zones. The key to using a material like this is to apply it to a large area (as shown in this photo) so that it’s clear that using it was an intentional design choice.

Key Measurements for Your Living Room

Whether you are laying out a living room for your first apartment or planning one for your new custom home, understanding the scale of furniture and its relationship to the room can help you create a comfortable and functional space. The first thing to keep in mind is that you want the proportions of the furniture to coordinate with the proportions of the room. The following layout suggestions and common furniture sizes will help you get the living room design you want.

Single Sofa

Sofas are used frequently in most households. Buy a good-quality one so that it holds up, feels comfortable and maintains its looks. On average sofas are about 84 inches (213 centimeters) long and 38 in. (98 cm) deep. A 72-in. (183-cm) sofa could work well in a smaller living room, while one that is 96 in. (244-cm) long could fit in a larger space.

Sectional Sofa

Essentially made up of two sofas placed perpendicular to each other, sectional sofas add plenty of seating. As with sofas, sectionals come in various sizes. Two 84-in. (213-cm) sectional pieces together need a space that is 7 feet (213 cm) wide and 10 feet (305 cm) long, which is usually a significant portion of a room.

Shaped Sofa

Sofas like this one, and other shaped sofas, usually take up more space than average. This example is about 11 feet (335 cm) long and needs a total depth of about 54 in. (137 cm).

Televisions

Since televisions now come in a wide variety of sizes, arranging furniture for them depends on which TV is chosen and how it’s used. Depending on your TV type and screen size, you will want to keep your seating within 1.5 to 2.5 times the diagonal length of TV screen.

Key Measurements for Planning the Perfect Dining Room

A dining room remains a desirable home feature, whether it is a distinct room or integrated into an open plan. Shapes and sizes of dining tables, chairs and furniture need to be considered so personal movement is not impeded when the room is fully in use.

Table and seat heights tend to be standard but all else varies greatly. Take into consideration your decor, your lifestyle and how frequently you will use the space when you’re planning a layout and shopping for furnishings.

Traditional. Traditional dining rooms can be generously proportioned, as this one is. Long, rectangular tables that adjust with leaves typify its style, while a sideboard provides storage for table linens and serveware and functions as a serving platform. Freestanding glass-enclosed china cabinets are still readily available. However, the design here shows a built-in that serves this purpose on the wall between the windows. This room also hosts a fireplace on an opposite wall.

Spaces with these features and furnishings require a larger-than-average room. You will need at least 14 feet (4.3 meters) in width and 16 ft. (4.9 m) in length for a similar arrangement, but 15 ft.(4.8 m) wide by 20 ft. (6.1 m) long will likely function better.

Contemporary. Smaller-scale furnishings in modern designs will suit contemporary tastes well, as illustrated in this room. This layout also supports a sideboard, but its table is a fixed rectangular plank style with bentwood chairs and rush seating. A modern glass chandelier replaces the traditional crystal type shown in the previous photo.

Setting Up A Specification For Annual Roof Repair

Can you patch a roof from the inside?

This section is a step-by-step guide to find the source. Some methods require two people plus roof and attic access. Contact a professional if you’re unable to execute any of these steps safely.

Locating the exact leak location isn’t always as straightforward as it may sound, especially with pitched roofs. Leaks tend to be higher up from the obvious interior leak. Water gets under the shingles and then travels down the rafters or sheathing before finally finding a nail or protrusion to aim that stream of water at your ceiling. Once there, it may pool and cause sagging or bubbling, or it may travel farther, finding light fixtures or other openings to drain through.

Below are the tools you’ll need to help you discover the source of the problem.

  • A Helper
  • Ladder
  • Garden Hose (if it’s not raining)
  • Dust Mask
  • Flashlight
  • Tape Measure

Finding the Leak

Finding exactly where the leak is coming from can be the most challenging part of fighting the leak. One common cause of leaks in the home is that water has entered through the roof, and settled into a pool inside the ceiling. When this happens, your ceiling will become waterlogged and will start to bulge; you want to get this water out right away. Get a large container and place it under the ceiling, then puncture the middle of the bulge to let the water flow freely. You’re already going to need to repair the ceiling, so this will allow the water to drip down instead of pooling more and damaging a wider area.

Once you’ve addressed any damage coming into the house, get up into the attic around the location of the affected ceiling. Be careful not to step anywhere that doesn’t have supports! You don’t want to do any more damage to your ceiling than has already been done. Using a bright flashlight, locate the affected area, and find the trail of water back to where it’s entering your roof.

Fixing the Leak from the Attic

Once you’ve spotted the leak, and found a way to get to it, you can patch it up temporarily with any durable material. Even a wooden plank or some spare shingling with roofing tar will do the trick; if you don’t have any on hand, sprint to the hardware store and get some so that you can fix the problem quickly.

Spread the adhesive material over the leak from the attic and hold your patch in place until it’s secure. Then, apply some more tar where the patch meets the roof to lock it in. Take good note of where the leak is from the inside so that you can find it more easily once you can safely get up onto the roof outside

What If I Can’t Find The Leak?

If you can’t find the leak in your roof you will need to cover it quickly with some plastic roof covering.  This also goes for homes where there is no attic or attic access.  Follow these steps to protect your home if you can’t do a temporary patch.

Buy & Prep The Roof Plastic

You likely don’t keep roof plastic just hanging out in a closet.  So, you’ll have to head to the hardware store or call for help.  Plastic roof covering comes in 4-foot rolls of polyethylene.  Buy some and head home to get it placed on your roof.  You’ll also need some 8-foot 2×4’s to act as anchors for your roof covering.

Cut The Plastic To Length

You’ll want to unroll the plastic with a little more length to run from the top of the roof (the ridge) to the edge of your roof (the eave).  Don’t unfold your covering yet and cut it to length with a utility knife.  You can use one of your 2×4’s as a guide to make the cut as straight as possible.  Once it is cut to length you will unfold it to make a section that is long enough for your roof, and about 8 feet wide.

Attach The Cover To 2x4s

Roll one of the ends around an 8 foot 2×4 and use a utility staple gun to attach it to the wood.  Take a second 2×4 to and sandwich the plastic between them, then nail the 2×4’s together.  Do the same thing on the other end of your plastic roof covering to finish preparing your cover.

Place The Cover On The Roof

It should go without saying that safety comes first and if there’s lightning, you don’t have the ability, or the right equipment to get this done; you should be calling for emergency roof repair.  If you’ve got rubber soled shoes, a saw to cut the 2×4’s, a ladder, and some courage to jump on your roof take your cover up there and set one pair of the 2×4’s over the ridge and then stretch the rest to go down to the eave.

Roof Leaks – Deciding to DIY

If you are sure that you want to DIY your roof leak, here are some helpful steps in order to fix the leaks.

  • First you need to seal the leak ASAP. Find out where the source of your leak is. Examine the underside of your roof from within the attic or crawl space.
  • Second, shine a flashlight along the roof’s underside and check to see if there is a hole in the roof. You’ll also need to look for any wet areas or dark spots caused by moisture.
  • Third, the areas which you found to be leaking should be marked with some chalk so they can be spotted quickly.
  • Fourth, the wet areas need to dry before sealing. Once they have dried, apply a patch to the underside of the roof. Using a putty knife will be the easiest way to do it. Cover the entire leaky area.
  • Fifth, use a Caulking gun to apply caulk to seal any holes that are in your roof. The putty knife will help you spread the caulk evenly to cover the holes.

Using Sealants as the Solution

If the leak is due to faulty or missing flashing, sealants might be the cure. Use sealants on all flashing around skylights and protrusions like a chimney or vent. You should never use them to fix shingles permanently. It may work as a stop-gap measure to fix broken or cracked shingles until you have time to replace them.

For a quick, short-term shingle fix, all you’ll need is some mastic or roofing cement, a trowel and a flat bar:

  • Lift the broken shingle up with the flat bar. You may need to pry the nail out a bit. If you do, don’t forget to hammer it back in at the end.
  • Spread the sealant. Using the trowel, spread the sealant under the broken shingle.
  • Flatten the shingle out gently. The sealant should seal the cutout – the gap between the tabs – on a three-tab shingle.

Things To Know Before Custom Home Builder Start Building

What questions should I ask a builder before hiring?

Building and remodeling are big undertakings. These types of projects are exciting, and we want you to feel that excitement as the experience should be a fun one. We enjoy what we do and it’s important to us that the experience for our clients is equally enjoyable. There are so many decisions to make with a new build or remodel. Take a deep breath. The number one thing you’ll want to do in the pre-planning stages is to do some in-depth research before hiring a contractor by asking the right questions. Knowing which questions to ask a potential contractor can help you to feel much more secure in the decision-making process, helping you to make a confident decision in who to ultimately work with.

Are you insured and can you provide validity of this?

This one might seem an obvious question to ask a contractor before working with them, but you’d be surprised how many people skip this simple yet all-important question…and often end up suffering for it. A good, reputable contractor will be happy to show and proof of insurance. They will often showcase this on their website, marketing materials, and even offer it up in conversation, which only adds to their credibility. Do yourself a huge favor and ask them if they’re insured, regardless of whether or not they were referred to you by even your best friend.

Will you provide me with a full list of references?

A good builder will happily provide you with a list of solid references. This is not an unrealistic expectation. Ask for a list of recent references (clients they’ve worked with within the past 2-3 years), as this would be the most relevant and up-to-date. In addition, create a list of specific questions you’d like to ask these individuals to help guide the conversation and keep it productive. Ask questions regarding timelines, communication, and quality of the work they received. Keep in mind that some delays are unpredictable, but previous clients can offer insight into how their timelines were affected and more importantly, how well the builder communicated the details throughout the process.

Are you a licenced builder?

This is the first question you need to ask. Only ever work with licenced tradesmen. It may seem like an obvious point to reinforce but people either don’t ask or go with an unlicensed builder to save money. The results can be disastrous. Each state allows you to run a search on builders to check their licence, a simple Google search for ‘check a builder’s licence’ will get you started, please do it.

How long will the building maintenance period last?

A builder agrees to perform building maintenance for a period of time after the property is handed over to you. Most experts recommend a six month maintenance period for residential units and 12 to 18 months for commercial properties.

What’s included in your price? 

What are the standard finishes and items, and what are upgrade items?  More importantly, throughout the entire process, what isn’t included and may come up?

Most of this should be outlined for you in the contract details, but knowing what’s not included will help a lot with budget planning.  Does the builder include the design drawings, permits, landscaping, appliances?  Do they include hazardous material removal?  Avoiding the dreaded hidden/unknown charges will be dictated by how well they’re able to answer this question.

How do you ensure that I will not exceed my budget?

Yet another question that past customers will help you confirm, but here’s where you want to know how the builder’s communication style works.  It’s critical to feel confident that your builder will work with you to keep you within your budget and communicate how changes impact the budget.

Can I show your construction contract to my lawyer prior to signing?

Does this builder have a contract which clearly outlines all the details of what’s included throughout the process, and do you have sufficient protection?  Asking this simply question will help filter out those who do not like to bother with details and will be the people who you’d like to stay away from.

Can you give me references from prior home buyers?  Do you have any completed homes I can view?

Checking references are extremely important as it will help you make a much more informed decision based off of their prior experiences with the builder.  Also, as quality is very subjective, seeing a completed home for yourself will help align your expectations.

Etiquette Tips For Working With A Custom Home Builder

There are tons of horror stories out there that people have from working with contractors and home builders. Sometimes it’s because of poor research, misaligned expectations, or someone just lying, most of the time though it comes down to communication. With communication comes its own set of problems. Building a custom home is a stressful and personal undertaking. Having a good relationship with your home builder will help ease the process and will likely result in better quality work. Here are a few etiquette tips on how to deal with and communicate with your custom home builder.

Respect work hours

The normal 9-5 hours might not completely apply but don’t call or text your home builder at 2 am. Ask them for their work hours and if you have any questions or concerns after those times you should email them. While your custom home builder is committed to your project, they’re also a human being with a life outside of their job. This project might be all you can think about but respect the work/life balance they have.

Stop designing

At a certain point, you will need to stop yourself from going on Pinterest and Instagram. These sites are full of great ideas but after a certain stage changing things around really isn’t feasible. Continuing to look will just make you wish you could continue to add and change.

Get everything in writing

Get everything that you want your home builder to complete in writing. In the end, this will save both of you from arguing about price and jobs completed. Make sure everything little thing is included too. Having a firm understanding of expectations, design choices, and job lists will help with communication and expected end results.

Communicate with visits

Any good custom home builder will encourage you to come see the project during its construction phases. You’ll read a lot of people telling you to randomly drop by to make sure work is getting done. While you can drive by and do this, don’t expect a full tour at random. Your home builder will be busy working. Call ahead and set up pre-arranged times. This way they can go through everything with you in details. Stopping by unannounced also poses safety and time issues.

Expect delays

Even if the most researched and well planned out projects by the most experienced builders will encounter delays. Whether or material deliveries are a few of the most common causes for delays. Letting a delay unravel you and send you into a panic is never helpful. Don’t blame your contract unless they made a blatant error. Expect delays and learn to cope with them. Most home builders will work hard to compensate for them but if you throw a fit they’ll probably be less inclined.

Don’t take your stress out on them

Custom home builders are used to absorbing some of the stress people are under during a build. Try to keep this at a minimum though. A slight tone is one thing, but a complete blowout is unacceptable. A home build is extremely stressful, but having a good working attitude with your home builder will make things go smoother. Taking your stress and frustration out on them will only make things worse.

Be on the same page

If you’re building a home with a significant other, make sure you two are on the same page. It even helps if you select one person as the designated contact person. Preferably pick the person who is available the most. Miscommunication and mistakes get made when you and your partner are telling your home builder different things.

Set reasonable response expectations

There are a lot of times during a project where you or your home builder will need a response quickly. Many aspects have strict deadlines. Before you begin, set up an ideal timeline and means of communication for these types of situations. But also set up a time frame for non-time sensitive questions or concerns. A day or two is normal. Both you and your builder will be busy. Don’t expect them to respond within an hour to a general question.

Tipping and gifts are nice but not necessary

People often stress about tipping or gift giving as a project begins to wrap up. Here’s the thing about tipping, it’s always nice but it isn’t necessary for a custom home project. There’s no set percentage so figuring out can be complicated. Some people like to give money, other’s gifts, some just throw a party for their builder and contractors at the end. If you feel they did excellent work and have a good relationship with them some gesture to show your appreciation is always great.

Tips For A Wedding Photographer New To The Business

WHY I’LL NEVER BE A WEDDING PHOTOGRAPHER

I have seen so many posts across various websites and facebook groups this week all centred around one theme – wedding photography. Wedding season is well and truly upon us and I guess that everyone who’s getting married this summer has already booked their photographer. But their guests who are getting married next year or the year after? They’re the ones probably starting to think about who’s going to photograph their big day. And it’s a huge decision to make.

So why the blog post? What has riled me up so much that I feel the need to write about it in a blog?! Well to start with I am not nor have I ever been a wedding photographer. So I’m not touting for business. But basically when people book a photographer (any kind of photographer) I want them to get what they’re paying for – I love value for money no matter what your budget. But certain threads and posts written recently by professional photographers make me think that not everyone has the same standards and that really winds me up.

I hate my own wedding photos. There it is, I’ve said it out loud. I’m not going to name and shame and I hope my photographer never reads this. I don’t have one single wedding photo up in my house. The only one you’ll ever see online is the one in this article. I asked for documentary style photos, snapshots of the day. “I don’t want poses” is what I said. “Let’s spend 2 hours of your day doing posed photos” is what the photographer heard. You’d think that in all that time that every base would be covered. Apparently not, because there’s not one photo of me and my dad on my wedding day. He’s in some group ones, but not one photo exists of just me and him on that day.

Which brings me to my second point. If you don’t know that you can nail it first time, every time, all day, don’t tell people that you can. I can take great photos of your family for you, I know I can. But if you asked me to be your wedding photographer? I’d say that I really appreciate you asking, but that there are people who are better suited to what you need. But not every photographer will be that honest with you. And I have a real issue with that.

We all know that weddings can be expensive. I say ‘can be’, because loads of people can and do get married on a small budget. But it doesn’t seem to matter how much people are willing to spend on other aspects of their day, when it comes to booking a photographer, I hear the words “that’s so expensive!” stupidly often. I couldn’t cope with hearing that about my own work again and again. Does it cost a lot to hire a good wedding photographer? Most of the time – yes

The Best Gift You Can Give your Photographer

Time and time again I am so overly blessed by my clients, and although it cane seem to be an “Awkward” topic… talking about tipping or blessing your photographer doesn’t have to be awkward!  Whether it be through words, action or a physical gift,  so often I have friends and clients asking me “I really want to thank my lake garda wedding photographer for what they did and how they captured us!

Thanking them at your wedding! Wow, just last weekend a bride and groom got up after speeches and gave the proper verbal “Thank You’s” to all their friends and family for all the work they put in… THEN they didn’t stop there… they literally said to their guests  “You have seen our photographers running around all day and we want to thank Tonie Christine Photography from the bottom of our hearts for being more than just a photographer, but a confidence booster, a dress fluffer and such a joy to work with from start to finish” … Que the jaw dropping right there! I was so so so honored to be mentioned by name on their wedding day that I fear I looked like a Miss USA Contestant fanning my dropped jaw… but really people… even a hand written note mailed to us after the wedding, or a shout out at the wedding goes SUCH a long way!

A TIP! Many people don’t realize how much a tip means to us as photographers! The money that you invest in us is a big deal and we are so thankful you chose US…. but here’s the thing… a tip speaks volumes to us. It says 1.) You are worth every penny I paid you and then this little extra and 2.) it says “We want you to treat yourself to something nice with this tip and not just put it back into your business!” Meaning we have the freedom to grab a massage, manicure or that new top we have been eying and not even feel guilty about it! Not to mention each time I am given a tip, it makes me melt inside. It’s for sure not necessity, but if you feel like your photographer went above and beyond, it’s never to late to mail them a little note and a small tip! I am not even talking about a certain percentage or a package price or what you would pay a server… I just mean whatever is on your heart to bless them with, DOES NOT go unnoticed!

Something personal. One of my favorite things to do is scour friends’ Instagram accounts and Facebook pages for things they love! Not just Starbucks gift cards, camera paraphernalia  or something generic (not that it’s a bad thing to do a Starbucks card as we as photographers frequent coffee shops ? ) but to really look and find something unique that you see they LOVE! Knowing that your photographers favorite candle came from Anthropologie, or that they eat all the time at a certain restaurant in town near you, or better yet, the colors they love to display in their home can really go a LONG way when buying them a small gift that makes you think of them! My favorite example of this is a bride of mine last summer knows I have an undying love for all things black and white and gold… after her wedding day, she literally went back to the boutique she bought her bridesmaids gifts at, and bought an additional black and gold necklace that she bought for all of them and mailed it to me with a card that simple read “I felt like you could have been a bridesmaid all day with us, and instead you were working all day. Thank you for being not only our photographer but our friend” WHOA… cue the tears! (Thanks Ari!!

Social Media Shout Outs and rave reviews online anywhere! These go a LOOONG way with us as photographers! We send you your gallery of images that we have worked hard on and we wait holding our breath wanting to either hear back from you via email or see a totally rad post online somewhere! When you tag our businesses (not us personally) on Instagram, Facebook and leave our website addresses when you post wedding photos, your friends and family respond to that! They look us up and they follow us too! This is how we gain our advertising and new clients which leads to my number one gift to give your photographer…

Legal things every wedding photographer needs

Weddings are full of something old, something new, and something blue…at least in the bride’s mind.  As a creative industry professional, photographer or videographer, it is your responsibility to fill the legal gaps that may not be necessarily apparent to the client to ensure their day goes off without a hitch.

Insurance Policies

No matter the business formation chosen (See: Quick Legal Checklist: How to start a photography business – the right way!), insurance should be secured to fill the gaps that contracts and formations may not provide.  At a minimum, a wedding photographer should carry liability and equipment insurance.

Back-Up Measures

Due to the “can’t-reshoot” nature of weddings, having back-up measures in place is not only a smart and common-sense move but is a professional requirement.  These backup measures include back-up equipment and back-up photographers.  Despite the attentive care that may be given to equipment, technology fails.  Having a back-up setup, cards, and batteries (at a minimum) are a requirement for a wedding photographer to fulfill their legally bound service to the client.  Further, sickness or accidents may arise that prevent the primary photographer from fulfilling their duties, therefore, a back-up photographer should be on stand-by in the event of an emergency.  Always have a backup plan!

Wedding Photography Contract

This document is an agreement or a promise that has legally binding rights and obligations that can be legally enforced.  It also outlines the responsibilities of both parties including time, place, money, products, and services.  Snag your own wedding contract template here. This agreement should also go a step further to outline all  specifics, cancellation policy, late policy, reproduction rights, expectations of both parties, guarantees, and waiver of responsibility in certain events.

Independent Contractor Photography Contract

Working with a second-shooter or assistant on an Independent Contractor (IC) basis demands the use of an agreement between primary photographer and the IC.  Note: IC’s are not merely given IC status by labeling them as such.  The general rule is that an individual is an independent contractor if the payer has the right to control or direct only the result of the work and not what will be done and how it will be done.  You are not an independent contractor if you perform services that can be controlled by an employer (what will be done and how it will be done). This applies even if you are given freedom of action. What matters is that the employer has the legal right to control the details of how the services are performed.

Wedding Photography Hacks for Total Amateurs

The way I’d describe the first time I photographed a wedding would be with words like “scary”, “stressful”, and “fun”. There is a whole lot that goes into creating excellent wedding photography through every part of the day – from prep photos in the morning to the grand sparkler exit at night

Get Organized Before the Wedding

It’s easy to fall into the trap of thinking that wedding photography is just about being good at taking photos. Sure, that is a huge part of it, and at the end of the day – your clients will be paying you to produce great photos. But there is so much more that goes into the process of making great wedding day photos.

A few ways to get organized before the wedding include:

Create a shot list. Shot lists can be useful ways to remind yourself what photos you want and need to take. The most important shot list of the day for me has always been a list of family formal pairings – this has allowed me to call out names and get people grouped together, instead of just trying to wing it.

Put together a wedding timeline. The wedding timeline is the single most helpful thing I put together. With input from my clients, I’m able to write down the timing of every important event. By putting this schedule together, it helps set expectations of when things will need to happen (like portrait times), and where I need to be for things like the ceremony and start of the reception. I’ve also found that is HUGELY helps reduce stress for my clients too – because they can see their big day laid out in front of them.

Learn what your client wants. This is not always easy, but it’s hugely important. With some clients, you may be in constant contact through email and text messaging – and they have probably spelled out their wants to you a few times over. With others, they may be super quiet – which can be absolutely fine but lead to missing out on things when the big day comes. To help get clarification easily, send out a questionnaire asking questions like “What are the most important pictures for you to walk away with?” and similar.

Prepare in Advance

Being prepared to shoot a wedding early will help you eliminate stress and feeling frazzled. It will also make sure you have all the things you need with you when you arrive to shoot your client’s big day.

Use the Best Gear You Can

I totally understand that most wedding photographers who are just starting out won’t have that great of gear. If you’re shooting weddings for free or at a super low rate – this won’t be a big problem (most of the time).

Why You Shouldn’t Give Your Wedding Photographer a Shot List

It’s sort of reasonable to over-plan your wedding, but turns out, having an iron grip on every detail isn’t always a good thing.

Shot lists. For the most part, they suck. Didn’t expect that I’d say that? Of course there are exceptions, but its crucial to remember that picking the right photographer (i.e. a good photographer) is far more important than making sure they have a perfectly prescribed list of shots.

Wedding days are chaotic. Things go wrong. Emotions run high. When you give a photographer a shot list for the wedding, you are doing two things. First, you are forcing them to capture contrived shots / setups that aren’t naturally occurring. These photos never look good. They feel fake because they are fake. The second thing that shot lists do is force the photographer to be buried in a piece of paper, making sure they check all the boxes. What a photographer should be doing is staying present in every moment, ready to shoot and document things as they happen. These are the photographs you will cherish.

When I talk about “shot lists,” I’m specifically referring to sheets of paper that have bullet points like “shot of groom laughing,” and “shot of bride walking away from the camera showing back of dress.” Those tend to be unhelpful and counterproductive. There are other types of shot lists that are totally fine and necessary, like family group combinations. Photographers will always need these shots listed out since they have no idea who anyone is at a wedding. We recommend that the couple assigns a close friend or relative to help us get the right people into the shots. They can also remind us of other things that were important to the couple, such as getting a photo with grandparents.

To boil it all down to one sentence: After finding the right photographer, help them with lists of family photo combinations, then trust them with everything else. Every photographer works a little differently and may deviate from some of this advice, which is totally fine and to be expected. But please, avoid the hyper-detailed, redundant list of shots that the photographer already knows to get. It’s frustrating when we see the couple request “shot of bride and groom during the ceremony,” as if we wouldn’t get that shot unless they told us.

Reasons Why Finding The Right Pro Accountant Can Save You Thousands

Supporting you during COVID-19

working from home

Working from home has become the new normal in 2020. We’ve reconfigured our home offices and found ways to make our new working environments as productive as possible

Accounting handover checklist for not for profit CEOs

Every individual within an organisation has their set of responsibilities. But what happens when a key staff member leaves and no one else in the company has access to the information that person managed?

SVA and CSI COVID charity financial health check

Social Ventures and the Centre for Social Impact have teamed up to model the potential impact of COVID-19 on the financial health of charities, with the report released in June 2020.

EOFY tips for not for profits

The end of the financial year is looming and we know that this year has been unusual, to say the least. We want to make sure you are well prepared for 30 June and the coming audit season… so we have a selection of tips that will help you get organised.

Strategies for NDIS providers facing financial challenges

AFG’s NDIS clients are actually in a very good position despite COVID-19 – one has even been able to extend the reach of their online group programs to regional NSW for the first time – so it is possible to survive or even thrive in the circumstances.

BASIC ACCOUNTING SKILLS EVERY PROFESSIONAL ACCOUNTANT MUST HAVE!

The world of knowledge is infinite, which means that there is no end to learning, unlearning and relearning new skills that are in sync with the changing times. The same is in the case of accounting, where managerial accountants need to have varied basic accounting skills and need to keep themselves abreast of the new developments in the domain.

Interpersonal skills:

There is a misconception that an accountant’s work involves purely number crunching. But along with strong quantitative skills, an accountant should also possess great interpersonal skills such as empathy, client management, negotiation skills, etc. Being an accountant, they have regular meetings with several clients, colleagues and professionals. Hence, good interpersonal skills are vital to the success of an accountant.

Taxation

Taxation is a very volatile and dynamic subject. It requires advanced knowledge, which is only possible through rigorous reading and strong experience. It is an accountant’s responsibility to help and navigate their customers through taxation procedures in the most ethical and hassle-free way.  An accountant should have an in-depth understanding of various taxes, tax income limits, taxable items, tax rates, etc.

Analysis

To become an ace accountant, he/she also needs to conduct variance analysis, price and volume analysis, product profitability, cost analysis, life-cycle cost analysis, capital budgeting, strategic planning, forecasting, allocation, etc. to ensure the best allocation of resources and achieve management goals.

Accounting basics

An accountant should know how to prepare financial statements and accounting reports for planning, controlling, budgeting and decision-making.

Accounting skills to list on your resume

If you’re working toward a degree in accounting, the next thing on your mind should be preparing your accounting resume for a job in the field. Whether your goal is to be an accountant or to work in business management, an accounting degree can be the crucial key to helping you find success.

There are three main types of accountants; tax accountants, auditors, and industry accountants. Each of these different types of accounting careers has very different job responsibilities, and different skills that are needed to succeed. Tax accountants are just what it sounds like, accountants who do taxes. Audit accountants perform audits on companies, internally or externally, to ensure that proper financial and accounting practices are being performed, and that the financial statements of an organization are correct. Industry accountants work in public or private sectors for individual companies handling their overall finances.

Accounting skills.

There is a distinct difference between hard skills and soft skills in the workforce. Hard skills are the specific tasks and abilities you need to be able to do to in order to perform your job functions, and perform them well. Hard skills translate to the tasks you’ll need to be able to do day in and day out.

Performing accounts payable and receivable functions. This is an industry accounting function that boils down to writing checks and managing the budgets for your vendors. It means working with department heads to understand what the vendors do, establishing budgets with departments, and working directly with the vendors to send them their checks when they submit invoices. Skills in accounts payable and receivable are extremely relevant for those in industry accounting and is a great skill to list on your resume

Managing vendor accounts. Accounting departments in industry accounting are often responsible for managing all the vendor accounts that need to be paid. This means loading them into whatever software system you use, making sure they’ve delivered their goods or services, and more. On your resume it’s smart to list that you have direct experience in working with vendor contracts, tax documentation, and invoices. All of these elements are used by accounting departments every day, especially in industry accounting.

The Role of Accounting in Business and Why It’s Important

The term accounting is very common, especially during tax season. But before we dive into the importance of accounting in business, let’s cover the basics – what is accounting? Accounting refers to the systematic and detailed recording of financial transactions of a business. There are many types, from accounting for small businesses, government, forensic, and management accounting, to accounting for corporations.

Why Is Accounting Important?

Accounting plays a vital role in running a business because it helps you track income and expenditures, ensure statutory compliance, and provide investors, management, and government with quantitative financial information which can be used in making business decisions.

There are three key financial statements generated by your records.

The income statement provides you with information about the profit and loss

The balance sheet gives you a clear picture on the financial position of your business on a particular date.

The cash flow statement is a bridge between the income statement and balance sheet and reports the cash generated and spent during a specific period of time.

It Helps in Evaluating the Performance of Business

Your financial records reflect the results of operations as well as the financial position of your small business or corporation. In other words, they help you understand what’s going on with your business financially. Not only will clean and up to date records help you keep track of expenses, gross margin, and possible debt, but it will help you compare your current data with the previous accounting records and allocate your budget appropriately.

It Ensures Statutory Compliance

Laws and regulations vary from state to state, but proper accounting systems and processes will help you ensure statutory compliance when it comes to your business.

Accounting Vs Finance: Which Should You Study?

The popularity of FAME subjects (finance, accounting, management and economics) comes from their vital role in the world of business, particularly those first two letters of the acronym: accounting and finance.

The primary difference in the battle of accounting vs finance is that accounting has a relatively narrow focus, while finance is wider-ranging, covering an array of specializations in the world of business, economics and banking.

Accounting vs finance

At undergraduate level, it’s possible to take a joint accounting and finance degree, in order to gain a more general knowledge of both accounting and finance professions. However, those who study further will usually specialize in either one or the other, in order to gain more advanced expertise in one particular field.

What do accounting degrees cover?

An accounting degree will provide a foundation for specialized accounting careers, as well as many other related careers. Accounting careers typically involve analyzing and utilizing financial information in order to evaluate a business’ financial position. This can involve anything from basic book-keeping to managing balance sheets and income statements. Accounting careers often have a large focus on past records and present reports, involving the creation and analysis of these records, and now often also extend to encompass planning, controlling, decision-making, stewardship, accountability and more

What do finance degrees cover?

A finance degree, on the other hand, is a great starting point for careers in financial services, across business, banking and consultancy sectors. According to US salary data gathered by PayScale, finance careers also have the potential to be slightly more lucrative than most accountancy routes. This is due to the fact that finance careers typically focus on the management of current and future figures of a business or organization, as opposed to just the recording of past and present income and expenditure. This means that those in finance careers often have the added responsibility of predicting and analyzing the potential for profit and growth, assessing monetary resources, utilizing accounting statistics and reports, and also looking externally for future funding options.

Car Buying Tips From Used Car Dealer

Things to Know When Shopping for a Car

There are 250 million registered passenger vehicles in the U.S. today — and just 115 million American households. According to government statistics, 57 percent of those households have two or more vehicles (9 percent have none).

It’s clear that for the vast majority of us, cars are essential tools that allow us to conduct our very busy and increasingly spread-out modern lives. They ferry us back and forth to work, they move our families from place to place, they help us complete our chores and purchases, and sometimes, they even let us get away from it all

What You Want (and Need)

Know what you want, before you start looking. It will save you a lot of time and could save you from a very expensive mistake.

Your Budget

While a car may be an essential tool, it’s also an expensive one. And unless you have stacks of cash — and even if you do — you need to figure out what you can afford to spend. After your mortgage or rent, your car payment is likely to be the next biggest item in your budget. So calculate carefully, and know what your finances will allow. You may need to cut other expenses to make room for a car loan.

New or Used?

Almost 13 million new vehicles were sold in the U.S. in 2011, along with an untold number of used cars. So which path is right for you? It depends on how you answered Numbers 1 and 2 on this list.

Things to Do Before Heading to a Dealership

to pass a little time before your movie starts, or to get away from the house while your mother-in-law is visiting, you owe it to yourself to do a few things first. These eight duties will each make your life much easier if you find a car, truck, van, or SUV you want to buy on the spot. Although some of them may take a little time, they’ll save you plenty of trouble later.

Make sure you have your trade-in vehicle’s title.

Are you someone who is notoriously disorganized? You probably have the title of your trade-in shoved between other papers. Do yourself a favor and look for it. Check every drawer, every box, and every niche in your home.

Get a copy of your credit report.

Not going to pay for your new vehicle outright? You’ll need financing, and that means the lender will want to check out your credit report. First, though, you need to have a good indication of what your financier will see.

Check out your vehicle’s honest trade-in value.

This is quite simple to do online and shouldn’t take up too much of your time. Be honest when inputting your information, and think the way the dealer will. For instance, would anyone really call your 15-year-old car in good condition if it’s dinged up and barely getting two-thirds of its original gas mileage?

Evaluate your capital and see what you can absorb.

It’s quite easy to get excited when you hop into a new Ford and realize that it’s the car you’ve been dreaming about for a long time. All that adrenaline can lead to poor decision-making, especially when it comes to your finances.

How to choose a car dealership

Your car-shopping experience will vary depending on the dealership you choose. In a recent Consumer Reports survey, 57 percent of those polled said they were very satisfied with their experience at the dealership, and 31 percent said they were somewhat satisfied. On the other end of the spectrum, 10 percent of the respondents said they were somewhat or very dissatisfied with their dealership experience.

That survey makes it clear it’s possible to have a positive dealership experience. It’s also possible to have a disappointing one. Your car-dealership adventure doesn’t have to be a luck-of-the-draw situation. There are steps you can take to make sure you choose a dealer with which you love doing business.

Price.No one wants to pay too much when purchasing a car, and people like to feel as if they’ve cracked the code and beaten the system when it comes to getting a great price on a vehicle. It’s human nature to crave a bargain.

Service. People need people, and even the most informed car shopper reaps rewards from stellar customer service. Service is key because informed client care rooted in integrity fosters trust between the consumer and the dealership, allowing you to focus on getting the right solutions to problems rather than avoidance of unnecessary expense.

Availability.Availability is essential, because if a dealer’s vehicle stock is limited, so are your choices. If a dealership doesn’t have models equipped with the options you seek, the dealer can special-order your vehicle from the manufacturer, but in many cases this can be a lengthy process. The simplest and most straightforward approach is to find a dealer offering a car with the options you want right there on the lot.

Things to Look Out For in a Used Car Dealership

Finding a reputable used car dealership can easily mean the difference between a car buying experience that is a dream come true, or a complete and total nightmare. As a used car buyer, learning to discern the difference between a good dealership and a great dealership, can make all the difference when it finally comes time to buy

the suburban streets are littered with used car lot options. From the roadside lot with shady salesmen and under-the-table dealings, to renowned locations with fair sales practices and a friendly team – the trick is learning how to spot the good apples in a barrel of bad ones.

Things to Look Out for in a Used Car Dealership

As you embark on the excitement of used vehicle ownership, first take a step back and learn four key attributes that every great used car dealership should have

Reputation: If there is one thing that consumers in America are great at, it’s giving their opinion of a buying experience. Whether it involves food at a restaurant, service at a neighborhood grocery store, or acquiring a new car, people in the United States love weighing in and using their voices. If the used car dealership you are considering does not feature online reviews, exercise caution moving forward. This either means that they severely sensor the reviews of their customers, or they are an overnight pop-up sort of shop – neither of which translates into a good thing for you. A reputable used car dealership should have a fair amount of exceptional reviews, with a few bad apples sprinkled in. Pay attention to how management responds to negativity, if at all. This is the best way to measure the level of customer service prior to engaging with employees at the actual dealership. A great business owner will respond promptly to complaints, and offer some sort of resolution. If a car lot has bad reviews without any sort of public response, be wary. Dealerships that do have negative report cards, but promptly respond with conflict resolution measures, are usually on the safe side. Regardless – don’t go into a used car dealership without first exploring its business reputation, and the management of said reputation. This is the first and easiest step to take in order to secure a positive used car buying experience.

Pricing Practices: All too often, used car dealerships take certain liberties when it comes to pricing the vehicles on their lot. New vehicles come with a manufacturer’s suggested retail price, or MSRP, so this unsavory sales method is not an issue when shopping for cars straight off of the assembly line. Keep a watchful eye on window stickers, and ask questions on any line items that are confusing to you. Used car lots are notorious for tacking on excessive items, as most customers don’t think to ask what a “dealer prep fee” is, or why they should have to pay for it. Bottom line – a great used car dealership will include all necessary fees in the car’s overall price, and will practice transparency in their pre-owned vehicle pricing.

Finance Fumbles: When a used car lot can’t get you to pay excessive dealer fees that are tacked onto the sticker prices of used vehicles, their finance department will try and take a shot at skimming more money out of your wallet. While most people will need to finance their new and used car purchases, a vast majority of those individuals don’t realize that they can obtain financing outside of the used dealership they are purchasing from. Whether you plan to get pre-approval from an outside institution or not, at the very least do your homework prior to heading into a dealership. Having a general idea of current finance rates, terms, and conditions, can help you spot a shady deal as soon as it slides across the finance manager’s cheap wood veneer desk.

Unnecessary Add-Ons: When a used dealership can’t get you to pay higher finance rates, or pay $500 for the car wash that took their minimum-wage worker five minutes to complete, they will likely try to upsell you on items you don’t need. While this shouldn’t be a deal breaker in and of itself, it should be approached with caution. Just as the restaurant will try to sell you the margarita with the more expensive tequila, so will any car dealership offer you add-on items to your vehicle purchase. Keep in mind, however, that offering something, and persistently pushing it on you, are two very different things. If the salesperson is making you feel uncomfortable or otherwise pushed into add-on items you have clearly expressed zero interest in, it may be time to move on. Remember, until you sign that final paperwork it’s never too late to get up and exit an uncomfortable buying situation.

secrets to getting the best deal on a new car

Prepare for sticker shock and new-car-loan awe. The average new car transaction price was $34,428 in December 2015, according to Kelley Blue Book. Meanwhile, the average loan amount for a new vehicle in the third quarter of 2015 was $28,936, according to Experian Automotive.

However, it doesn’t mean you have to spend that much to buy a new car. Whether you’re in the market for a new-new car, or looking for a previously owned set of wheels that’s at least new to you, there’s always a way to save money. Here are some of my top cheapskate car-buying tips.

That’s tough-love advice, but there’s a good reason for it. You might need to settle for a lesser model, opt for used instead of new or postpone your purchase to continue saving until you have the cash to buy. That’s because when you pay interest on something that actively loses value, you are losing money in two directions.

Kelley Blue book used the following to illustrate the “typical” financing deal:

Car sales price: $27,000.

Out-the-door price: $30,000

Down payment/trade value: $5,000

If You Don’t Buy With Cash, Get Preapproved

For those who can’t or won’t follow the above advice, at least get preapproved for a car loan before heading to a dealer. This will allow you to compare dealer interest rates to other available auto loan rates. It will also aid in you being able to focus on the sales price during negotiations rather than the monthly payment

Local Moving Guide For A Smooth Move

MOVING SERVICES

everything you need to make your move an efficient and stress-free experience. Whether you require residential moving, long-distance moving or commercial moving storage solutions,

hether you’re looking for moving help to relocate a single item or a full family home, offer our customers moving services that are fast, reliable and stress-free.

PROFESSIONAL AND FRIENDLY MOVERS

You will love meeting our team of efficient and friendly movers! crews will come in standard uniform ready to tackle any job with the proper equipment and a positive attitude. All of crews are led by a moving foreman that will oversee the service and have experienced and trained helpers to move your items as efficiently as possible.

A PUNCTUAL START TIME

will dispatch our crews from one of our various depots around and surrounding areas to get to your move started.

CONSTANT COMMUNICATION

From the first time you reach out to the completion of your moving day, are always here to help! commitment to unparalleled customer service is what makes us the best moving company. Prior to moving day, one of experienced moving coordinators will be there to guide you through the payment process and provide you with the most accurate estimate possible.

MOVING TIPS: HOW LONG DOES IT TAKE TO PACK A HOME?

Now this is a loaded question if there ever was one… because all homes are different, packing times vary from house to house. If you are moving house and have decided to do your own packing, these timeframes can be used as an estimate:

Studio to one-bedroom apartment: 1-2 days to pack.

Two-bedroom home: 2-3 days to pack.

Four-bedroom home: 4-6 days to pack.

These estimates are for all day packing and assume some experience with moving home and the organizational skills required. If you have not moved home before (or it has been a while) and want to pack for a couple of hours each day only, double or even triple the time you allocate for packing.

Many people like to do their own packing, as it is a way of ensuring that everything is packed the way that they would like it to be and is also a way to save on the cost of a move. If time is of the essence, however, a professional moving company such as Isaac’s can get the packing completed in a fraction of the time using trained professional packers and also have all the necessary equipment such as strong boxes on hand.

Moving tips to make your packing easier

Start with a tidy home: Packing up a home that’s in a mess is confusing and time-consuming… use the move as an opportunity to spring clean and de-clutter your life.

Start early – it always takes longer than you expect and is more than you thought it would be. Pack a couple of boxes a day for the few weeks leading up to the move and it will be a lot smoother.

Get strong boxes in a variety of sizes: You can buy these from your moving company, or visit your local home improvement store to buy good moving boxes – Supermarket dumpster boxes are not recommended as they are not strong and may fall apart.

Set up a packing area with all your materials and an area where you will put the full boxes that are ready to move. Make sure the full boxes are near the door and in an accessible place for the movers.

Have a packing strategy for each room – identify the items you don’t use daily and those can be packed first (even a few weeks before the move!).

Keep like items together – don’t mix food with clothes or books with ornaments, it will make finding and unpacking a headache.

Pack breakables tightly: Fragile items should not be able to “rattle around” in their boxes – fill in the gaps with packing material, soft towels or even old clothes.

Do an inventory as you pack: Label each box clearly with a number and the room the box should go to in the new house. keep a notebook handy to write down everything that goes in each box. Once you have finished packing, you’ll have a clear idea of exactly what has been packed (useful if any boxes go missing on moving day).

Mark the essential items (the one’s you packed last) with “Unpack First” so you know which are the boxes to open first when you arrive.

Pack a welcome box: All essential items that you might need during the first day or 2 in your new home should be easily accessible – tea and coffee, toiletries, pet accessories, children’s toys, medication and any other things that make your life more comfortable.

Movers can take care of all of the details

for complete home and business relocation services. No matter your needs, customized professional moving services from Movers can help make your move a breeze.

making your move as stress-free as possible. No matter the location – from high rises, to apartments, to single-family houses, to townhomes, to office buildings – fully bonded and insured moving team can handle all of your local area moving needs. With Moving, there’s no need to worry. experienced, professional movers will carefully pack up all your belongings and gently load them into trucks, deliver to your new location, unload, unpack, and even set them in place for you. And we’ll do it with a smile.

area moving specialists, we’re prepared for any challenge.

Moving knows that is a large community, which is why consider local moves to be anywhere within 150 miles of the greater area. You can rest assured that local Boston movers are familiar with the area and prepared to tackle any challenges your move may offer. Bonded and insured, professionally trained team will keep even your most fragile and prized possessions safe during your local move

What included in your local move

Full service packing and unpacking

Clean, fully stocked moving trucks

Protection of your home or office from damage

Same-day moving service when required

Bonded and insured movers

Competitive rates

Moves to locations within 150 miles

based moving professionals

Worry-Free Service

Efficient movers who stay until the job is completed

Delicate handling of your belongings

Available short and long-term storage options if needed

Moving Cost Guide & Estimate

How Much Does It Cost To Hire Local Movers?

One thing to note is that different company charges differently. Some movers charge by per hour basis, while others charge based on per trip, yet others charge based on the number of items.

typically cost between $250 to $1500

cheap movers able to provide the lowest prices between $250 – $500

other mid-tier companies between $500-$1,500.

As for per hour charges, the average moving rate is from $100 to $150 per hour.

Piano Moving Prices

depends on a few other factors, but in general:

Regular upright piano: $80-$120

Baby grand piano: $250-$350

Digital piano: $70-$100

Factors that can affect prices include proximity to the moving vehicle, presence of lifts. You can find out more about piano moving screening process in this article. It is best to talk to a few companies to compare quotations.

Disposal and Junk Removal Prices

Disposal fees start from about $50 and can go beyond $1,000. It depends on factors such as location, number and type of items, and whether there are stairs to climb to reach the customers.

Make the Right Choice with a Moving Company You Can Trust

you can expect only the finest moving expertise from team and accurate in-house quotes for the services you need.

movers are hand-selected to match the size and complexity of your move. Each person in team has undergone extensive targeted training to meet standards before they get the opportunity to serve you.

credentials, processes and systems have been modified and tweaked nearly to perfection over three decades of service.

As an additional security measure, conduct background checks on all moving staff as part of onboarding process to ensure safety throughout your transition. This way, you get most competent, trusted workers to complete your task, no matter how big or small your moving job is.

Secondly, it allows your business more options in the event of a critical change in objectives that requires unplanned mobilization and more. Lastly, being a singular moving and storage company gives you and your business an integrated logistics solution that can be called upon regularly and is already familiar with the layout and processes of your inventory management system.

Negotiating Tips For Home Inspection

What to expect from a home inspection

Home inspection basics

You’ve chosen a home, made the offer and now comes the inspection — a vital step in buying a home, particularly for first-time home buyers. 

How do I choose a home inspector?

Many buyers hire the first inspector they find. But don’t settle for less. Carefully research every home inspector and consider several factors:

Qualifications, certifications and training

Knowledge of building codes

Number of years inspecting homes

Referrals and references

Related work experience

Where can I find a home inspector?

Get referrals from family, friends and your real estate agent. Trusted sources act in your best interest. If you want extra assurance, ask the inspector if he or she belongs to an industry organization

I have a home inspector. Now what?

Your tasks don’t end once you choose a home inspector. You should also:

Attend the inspection

Carefully review the inspection report

The day of your home inspection

Before the inspector begins the review, carefully look over the home to identify defects and damage. Take pictures of anything that needs repair.

Things You Need to Know About Home Inspections

It doesn’t matter if you’re buying or selling a property, you’ll likely have to deal with a home inspection. A home inspection is an important part of a real estate transaction. It involves an experienced inspector checking the property’s appliances, electrical system, plumbing, heat and air system, roof, and foundation for minor and major issues.

Home inspections are optional

Unlike a home appraisal, which is mandatory by the lender, home inspections are not required. They are, however, recommended by lenders and real estate agents. If you’re buying a property and decide to proceed with an inspection, you are responsible for paying the cost. A property can look pristine on the outside, but have major flaws on the inside. An experienced, competent home inspector will be able to uncover many problems. These inspections are noninvasive, so don’t expect your inspector to open up the walls. But even with a non-invasive inspection, he’ll get a clear idea of the home’s condition and bring potential issues to your attention.

Be present for your home inspection

As a buyer, you don’t have to be present for the home appraisal, but you should be present for the home inspection. At the end of the day, you want to make sure you get your money’s worth. On average, home inspections can costs between $250 and $500. The inspection should spend a fair amount of time checking the outside and inside of the property. These inspections take roughly two to three hours depending on the size of the property. You should shadow the inspector so he can explain his findings to you. Also, don’t be shy about asking questions. For example, if you notice a crack in the wall, you can clarify whether the crack is a result of a foundation problem or the property settling over time.

Get a home inspection before listing your house

If you’re a seller, there’s also the option of having a home inspection before listing your property for sale. A house that looks to be in excellent condition and be anything but perfect. If you get a home inspection before listing the property, you can eliminate surprises down the road. A pre-inspection can provide a rundown of problems with the house, and you can take your time making the needed repairs. Once the repairs are completed, you can list your property with confidence.

Negotiating home repairs

There is no such thing as a perfect house. So regardless of whether the house is newer or older, the home inspection report will likely reveal at least one issue. As the buyer, you can ask the seller to repair all or most of these issues. If the seller isn’t prepared financially to cover the cost, you can ask for a credit or a price reduction. The seller can reduce the sale price of the property, or give a credit at closing for repairs.

Check Out Your New Home: The Ultimate Home Inspection Checklist

There’s a lot to remember when you’re buying your first home. To ease your concerns, it’s crucial to make sure that the home you’re buying is in good condition before you close. That way there won’t be any nasty surprises after you move in.

Should First Time Homebuyers Hire a Home Inspector?

Home inspection requirements vary by state. Your mortgage lender may not require a home inspection report to approve your mortgage, but that doesn’t mean you shouldn’t get one.

A good home inspector’s job is to go through your home and identify any potential problems. These problems could include obvious issues like termite damage, or they could be red flags that point in the direction of costly repairs down the line.

Whichever route you choose for finding an inspector, you should follow these steps:

Check home inspector licensing requirements for your state

Make sure that your inspector is comfortable having you present during the inspection

Verify a good working credit by reading online reviews before you hire anyone

Ask to see a sample inspection report

Ask what is covered in the report and what isn’t

The Home Inspection Checklist

Your work doesn’t end with hiring a home inspector. You should still be involved in this process. It’s your home we’re talking about. So, what do you need to do during and after your home inspection to protect yourself and your new home? Checklists can be an especially useful tool here.

Important Home Inspection Tips and a Checklist

Whether it’s a two-storey in the suburbs, a condo downtown, or a fixer-upper with potential, a home is much more than just a place to sleep. So it’s not hard to imagine why, when inspection time rolls around

Use a checklist

To ensure you’re hitting every corner of your potential new home, print out a checklist of common household inspection items. This should include all areas of the house, including bathrooms, bedrooms, garages and electrical elements.

Inside

Kitchen:

Check countertops, sinks, cupboard doors for damage

Ensure range hood exhaust fan works properly

Check pipes under sink for leaks

Check sink water flow

Floors, Walls, Ceilings:

Check for cracks, damage, water spots

Walk across all floors – ensure minimum unevenness, squeaking

Bathrooms:

Check faucet water flow & pressure

Ensure sink, shower, tub drains properly, toilet functions properly

Check for cracked/loose tiles

Ensure cabinets and plumbing under sink in good condition

Windows, Doors:

Ensure windows and doors open/close properly

Check for cracked/broken glass or damaged screens in windows

Inspect weather-stripping for damage

Basement:

Check for large cracks/stains in exposed foundation

Check for water leaks on ceiling/floor

No decay/damage in structural wood

Attic:

Check for structural and water damage

Ensure proper insulation and ventilation

How to Prepare For a Home Inspection

Home Inspection Preparation

How to prepare for a home inspection is a thought that more sellers should consider. Unfortunately many do not. One of the things that are quite common in the majority of all Real Estate transactions is a home inspection that is paid for by the buyer and performed by a licensed professional home inspector.

When selling Real Estate, a home inspection is typically done within the first couple of weeks after an offer has been submitted by the buyer and accepted by the seller. The Real Estate lingo used is called a “home inspection contingency.”

This contingency is spelled out in the agreed upon Real Estate contract. The traditional language in most purchase and sale agreements gives the buyer an out to terminate the contract if a severe structural or mechanical defects are found during the home inspection.

In some contracts, there will be a specified dollar amount that gives the buyer the option of revoking the contract if issues are discovered more than this agreed-upon figure. In a Real Estate transaction, the home inspection is one of the biggest hurdles a home seller faces to have a successful sale.

It stands to reason that you will want to make an effort to have your home in the best possible condition before the home inspection takes place. I can tell you from the experience of being a Realtor for the past thirty-two years; the home inspection is where most home sales fall apart.

How To Get Rid Of Annoying Ants

What do ants look like?

Ants are common insects that inhabit every continent of the world except Antarctica. Though they come in different colors, they all have three body regions: the head with antennae, thorax, and abdomen.  If you see flying ants, that means they’re mature males who will soon die after mating. Wingless ants are the ones that will infest your property.

At some point, it’s likely homeowners will need to know how to get rid of ants in their yard or residence. Ants are hardy insects that can easily make colonies in the ground and inside buildings. Not only can some species eat wood, but they can also cause painful bites.

While all ants can bite, not all species are likely to bite humans. Fire ants are the most aggressive species and are the most common biters. A blister with red spots forms soon after a fire ant bite. Carpenter, pavement, acrobat, field, and crazy ants can also bite humans when provoked repeatedly. It is usually easy to tell when you’ve been bitten by an ant because the area swells and has a stinging sensation.

What are ants doing in my house?

Ants are part of nature’s cleaning crew: they efficiently find and remove food left around the house. The problem is, sometimes humans don’t want their help.

You’ve probably noticed ants more commonly come indoors in summer – that’s largely because most insects are more active in the warmer months.

Ants occasionally come inside in search of water, particularly during dry periods. In this case you may see them in bathrooms or other humid parts of the house.

Heavy rains can also cause ant nests to flood and force them to relocate to nearby buildings, such as your house.

Home remedies for ants

So which home remedies and DIY solutions can you use for ants? Find out below!

Cinnamon

Cinnamon is often regarded as an effective DIY ant control option. It is believed that cinnamon acts as a natural repellent as ants can’t stand the smell.

This home remedy for ants involves using cinnamon essential oil as opposed to sticks or powder. It is believed that soaking a cotton ball in a solution of cinnamon essential oil and water and wiping down common ant hot spots, such as doors and windows, will help repel ants.

Will cinnamon get rid of ants?

Well yes, to a certain extent. A study in the International Journal of Scientific and Research Publications revealed that cinnamon essential oil can be used to both repel and exterminate ants.

However, there is a catch. The effectiveness of this DIY ant control solution depends on the concentration of the cinnamon oil, as well as the placement. For this home remedy to work, a high concentration of cinnamon oil needs to be used and it needs to be placed in the common areas where ants are entering your home. Identifying all the places where ants are exactly entering your home can prove difficult without proper training.

Vinegar

If you’ve read any of our other myth-busting DIY pest control tips, you’ll know that vinegar is often a common home remedy for insects. Ants are no exception.

To use vinegar as a home remedy for ants you simply need to fill a spray bottle with a solution of vinegar and water and apply it to the common ant hot spots and places where food is kept, such as cupboards and work surfaces.

Is vinegar a successful home remedy for ants?

Yes, but only for a short period of time. It is suggested that the aroma from vinegar masks an ant’s scent trail, preventing it from finding food. However, once the solution has evaporated it will no longer be an effective DIY ant control method.

To add to this, although it might help stop ants from finding food in the first place, it will have little to no effect on any infestation already in your home.

Lemon

Like vinegar, lemon is another home remedy for insects including ants. This DIY solution is thought to work as the acidic property of lemon juice masks ants’ scent trails and as a result, deters them.

For this DIY ant control option, rub lemon juice around door frames, window sills and other common entry points for ants.

Is lemon a successful home remedy for ants?

No, not really. Although lemon juice may seem like a successful home remedy for ants, it is not a foolproof solution. Yes, it may repel them for a short period of time, but in the long run, it has little to no effect.

Chalk

A common home remedy for ants is to use a piece of chalk to draw a border around the common entry points for ants.

It is thought that this works as ants won’t cross the chalk line, disrupting the scent trail.

Is chalk successful against ants?

No. Although it may disrupt an ant’s scent trail for a short period, the ants will soon find another way to continue on its hunt for food.

Carpenter Ant Control

Carpenter Ants are controlled through the application of insecticides and sprays in various forms. These forms include liquid concentrates, baits, dusts, and foams.

  • Non-Repellent Insecticides – Used as perimeter spray.
  • Baits – Used on Carpenter Ant trails.
  • Dusts – Used in voids and galleries
  • Foams – Used in voids and galleries

1. Inspection

The first step in controlling carpenter ants is an inspection. The purpose of the inspection is to determine if they are located outside and simply foraging inside for food, or if you have a colony or satellite colony inside your home.

2. Determine Control Measures

Once you complete your inspection and identify nest locations and foraging trails, the next step is to determine which control measure to use.

  • Baiting – used on carpenter ant trails
  • Spraying- Non-Repellent sprays used as permiter treatment, may be used with baits
  • Treating Voids – Foams or Dusts used in voids or galleries where carpenter ants are nesting

3. Prevention

The final step is to prevent further infestations by ant-proofing your home and yard, by clearing away rotting trees and lumber piles, fixing plumbing leaks, etc.

Little Black Ant Prevention

Homeowners should consider working with a licensed pest professional to employ a preventative pest management plan. There are also a few things that can be done around the property to prevent a little black ant infestation.

Homeowners should seal cracks and crevices in exterior walls with a silicone-based caulk, ensure firewood is stored at least 20 feet away from the home, and keep shrubbery well trimmed. Location of the nest is also important. While it can be difficult to see these ants due to their small size, their nests can be found by following the trial of workers back to the colony.

Interior Painting To Help Sell Your Home

How to Paint a Room

Painting a room can be a task that takes a couple of hours, a half day, or more. It all depends on what and how much you decide to paint. You can freshen up a room by giving a door or cabinet a new coat of paint in just a few hours. Or you can break it into smaller jobs and spread them out over a week or more. Whatever the size of the job you decide to tackle, the painting techniques remain the same.

In this article, we’ll take you all the way through the process of painting a room. From prepping to cleaning up, we have the job — and your room — covered. We’ll start at square one, with how you should use your painting equipment.

Brushes

When you embark on an interior painting job, you’ll soon discover how easy it is to use brushes and rollers competently. Even so, there are a few techniques that will help postpone fatigue and provide a neater job.

The grip you use depends on the brush you’ve chosen. Trim and sash brushes with pencil handles are grasped much as you would a pencil, with the thumb and the first two fingers of the hand. This technique gives you excellent control for intricate painting. With beaver-tail handles on larger brushes, you’ll need a stronger grip because the brushes are wider and heavier. Hold the handle with the entire hand, letting the handle span the width of your palm as you would hold a tennis racket. This technique works best when you’re painting large, flat surfaces.

The goal of loading a brush is to get as much paint on the wall as possible without dribbling it all over the floor and yourself in the process. It will take you only a few minutes to be able to gauge accurately how much paint your brush will hold along the way. Meanwhile, start the job by dampening the bristles of the brush (with water for latex or the appropriate thinner for other types of paint) to condition them and make them more efficient. Remove excess moisture by gently striking the metal band around the handle’s base against the edge of your palm and into a sink or bucket.

Decorating Home

Get the home of your dreams with our selection of decorating equipment and accessories

Wallpaper

Whether you’re giving your kitchen a new lease of life, jazzing up the kid’s bedroom or creating a statement wall in your living room, we’ve got wallpaper to suit any DIY project.

If you love wallpaper, paint and all things interior design, then you have come to the right place. The Range has a huge collection of wallpaper, interior paint, sanding and stripping tools, adhesives, fillers and more accessories to redecorate your house with style. If you’re going to do some wallpapering at home, The Range offers damask wallpaper, feature wallpaper and kids wallpaper. Get all your DIY done for bedroom, living room, kitchen and bathroom walls with our pasting tables, surface covers, ladders and brushes. And don’t forget to check out our design trends, best sellers and brands such as Coloroll, Crown and Arthouse.

If you’re looking to paint rather than wallpaper, stock Dulux, Hammerite and Crown among many other brands in every colour under the rainbow! Once you’ve got you got your primer sorted, take home some tester pots and choose your colour scheme. And to complete the new look of your home, we also stock exterior paint for your outdoor walls. Shop by brand, including Ronseal and Cuprinol, and be the most house-proud people in the street. Inside and out, The Range has got all your decorating needs under one roof.

How to Paint a Mural

Learn how to paint a mural in acrylics! These pages will cover all the common questions you might have if you want to paint an indoor mural, such as:

What type of paint should I use to paint a mural?

What other materials do I need to paint a mural?

How do I prepare a wall before painting a mural on it?

What are some mural painting techniques?

How do I finish or seal the mural?

What type of paint to use for an indoor mural

When you paint a mural, you’ll have two distinct stages of painting, just as when you paint on canvas: first you’ll create an underpainting to block in main areas of color and outline the general composition, and then you’ll paint in the detail.

To paint large blocks of color (such as a stretch of blue sky, green hills, etc), use  interior household paint, also known as  latex paint. This is the kind of paint you would normally paint walls with. Painting large blocks of color with latex paint is more economical than trying to cover the entire wall with the artist quality acrylics that you buy from art supply stores. You will get better coverage from interior household paint and save yourself a ton of money in the meantime as you learn how to paint a mural.

Interior household paint comes in four different sheens: flat, eggshell, satin and semi-gloss. An eggshell sheen works best for mural. Steer away from satin or semi-gloss sheens, because they will be too shiny. The flat sheen is also not the best choice because it cannot be scrubbed. Eggshell, however, is just right, because it can be cleaned and it can safely accept layers of paint on top of it. 

To tackle the detailed work on your mural, use your tubes and jars of artist-quality acrylics and proceed just as if you were painting on canvas. Most brands of acrylics will work well for indoor mural painting

Unique Interior Paint Ideas That Show Personality

One of the things that makes a home truly yours is showing your unique style. Interior paint is one of the best ways to do this, and even a small change can showcase exactly who you are. There are a number of ways you can use interior paint in unique ways to create a space people will ooh and ahh over.

Wall Colors

The most obvious choice for paint is adding color to your walls. Don’t be afraid to use a color a bit outside the norm, especially if you plan to live in the house for a while. If you’re planning to flip the house or sell soon, neutral colors are often best.

Furniture

If painting walls a unique color isn’t your thing, then choosing a bright color and painting an end table, dresser or table might be the way to go.

Kitchen Cabinets

White cabinets with black granite countertops might be the current rage, but what if you thought outside the box a bit? Instead of painting old, builder’s grade oak cabinets white, what if you went with a color that was unique? More distinctive trends include cabinets in a deep navy blue with gray tiles on your backsplash.

Ceilings

One trend that has been growing in popularity is adding a pop of color to a ceiling and keeping the walls a neutral color. This tends to add a fresh color without overwhelming the room. If sitting with friends and visiting, the color is barely noticeable, but it does make a statement when someone walks into a room. Consider white walls and a pop of orange or lime green on the ceiling.

Easy Fixes for Interior Painting Mistakes

Painting a room can be an easy and inexpensive upgrade, whether you’re freshening it up or dramatically changing the color. With a little planning and a few expert tips, this do-it-yourself project can be as quick and easy as it seems. Consumer Reports’ paint pro offers foolproof ways to prevent goofs and make flawless fixes.

Missed Spots

The goof. Blame this painting mistake on the lighting, fatigue, distraction, or spreading the paint too thin.

The fix. Good thing you kept the leftover paint (in a tightly sealed container, or course). After the paint dries—usually about 4 hours—touch up the missed spots with a brush. But if you do it before the paint dries completely you’ll mess up the paint surrounding the spot. As for spreading the paint too thin, a roller dipped in paint should cover a 2-by-2-foot section of the wall. See the video below for how to ace it.

Paint Runs

The goof. Perhaps you’re using a long-napped roller, loading too much paint on the roller or brush, or not spreading the paint well.

The fix. Once the paint dries, use fine sandpaper to remove the run, then retouch the area with a brush and a little paint, feathering the edges.

Roller Marks

The goof. A cheap roller with obvious seams could be the problem, and the paint makes a difference too.

The fix. Synthetic short-napped roller covers (1/4 inch) work best on most walls, ceilings, and trim. Use longer-nap roller covers for textured walls, or walls that have a very uneven surface from patching, for example. Rollers with steel frames and lots of tines are sturdier and stiffer than ones with just caps on the ends, and those sealed ends keep the paint on the roller cover.

Before using a new roller cover, use a piece of painter’s tape to remove loose lint. As for the paint, be sure to check out the smoothness scores in our interior paint ratings. They indicate whether marks from roller, brushes, or runs are obvious once the paint dries.